Four steps. The rules for each one stay on the RSA or NDLS page linked from the card.
01Theory test + learner permit
The RSA route starts with the driver theory test, then a learner permit. Check the current RSA guidance for where a learner-permit holder may drive, who must accompany them, L-plates, and category-specific passenger, trailer, or other conditions.
For most car learner drivers, Essential Driver Training is 12 one-hour sessions with an Approved Driving Instructor. Eligible learners may follow reduced EDT with six sessions; only current, eligible training should be relied on and your record is checked in MyEDT.
Between lessons, practise only within the current learner-permit and supervision rules. For a car learner, that includes the RSA’s restrictions on motorway and unaccompanied driving, the accompanying-driver rules, and L-plates.
Before relying on a test date, check the six-month rule where it applies, your required EDT sessions in MyEDT, your valid permit, and the current vehicle and insurance requirements, including the certificate of motor insurance rule.
Open a lesson for what it covers, what to practise between lessons, and the local roads it uses. A completed lesson is recorded in MyEDT.
Module 01
Car controls and safety checks
Walkaround inspection, fluid checks, tyres, glazing, and primary controls.
Lesson notes
What the lesson covers: Cockpit drill (DSSSM), under-bonnet fluid checks (oil, coolant, brake fluid, screenwash), tyre tread >=1.6mm, and starting/stopping engine smoothly.
Practice between lessons: 3 hours: Practice stationary cockpit drill, smooth clutch bite engagement, and progressive braking in an enclosed car park or quiet lane.
Local roads: Kilmaine rural departure & Breaffy House Hotel test centre parking bays.
Module 02
Correct positioning 1
Basic road positioning, safe clearances, and lane discipline.
Lesson notes
What the lesson covers: Maintaining normal road position (~1m from left kerb), driving on straight and moderately curving roads, and keeping safe lateral clearance from parked cars.
Practice between lessons: 3 hours: Practice steady lane positioning on regional single-carriageway roads without hugging the centreline or kerb.
Local roads: R311 Castlebar to Newport road & N60 Balla corridor.
Module 03
Changing direction
Mirror-Signal-Manoeuvre (MSM) routine, safe observation, and turning left/right.
Lesson notes
What the lesson covers: Applying MSPSL routine early, mirror checks before signalling, accurate positioning for left turns and right turns across oncoming traffic, and emerging at T-junctions.
Practice between lessons: 3 hours: Focus on early mirror checks (interior and appropriate door mirror) at least 50m before every turn.
Local roads: Station Road & Spencer Street junctions in Castlebar.
Module 04
Progression management
Smooth acceleration, appropriate gear selection, braking, and speed matching.
Lesson notes
What the lesson covers: Selecting appropriate gears (1st to 5th/6th) without looking down, block gear changes, smooth progressive braking, and making decisive progress when safe.
Practice between lessons: 3 hours: Practice accelerating briskly to the speed limit and maintaining appropriate gear without laboring the engine or coasting.
Local roads: N5 Castlebar bypass transition from 50 km/h to 100 km/h.
Module 05
Correct positioning 2 (Complex Situations)
Complex junctions, multi-lane roundabouts, and rural Mayo road positioning.
Lesson notes
What the lesson covers: Roundabout 12 o'clock rule, lane selection on multi-lane approaches, one-way systems, and negotiating tight rural boreens with passing bays.
Practice between lessons: 3 hours: Rehearse roundabout lane discipline, indicating left to exit after passing the exit prior to the intended exit.
Local roads: Moneen multi-lane roundabout & Station Road roundabout in Castlebar.
Module 06
Anticipation and reaction
Hazard perception, defensive driving principles, and creating stopping space.
Lesson notes
What the lesson covers: Scanning ahead 12-15 seconds, identifying developing hazards, maintaining 2-second dry / 4-second wet following distance, and reacting calmly without harsh braking.
Practice between lessons: 3 hours: Encourage the learner to verbalize potential hazards (pedestrians, tractors emerging, concealed entrances) as they drive.
Local roads: Rural Mayo regional roads with concealed agricultural entrances.
Module 07
Sharing the road
Safe interaction with pedestrians, cyclists, horse riders, and heavy vehicles.
Lesson notes
What the lesson covers: Passing cyclists with at least 1.5m clearance (1.0m in 50 km/h zones), giving priority at zebra and pelican crossings, and leaving wide berths for HGVs turning.
Practice between lessons: 3 hours: Practice patient following behind slow-moving vulnerable road users until a clear, safe overtaking opportunity presents.
Local roads: Spencer Street school zones & pedestrian crossings on Castlebar Main Street.
Module 08
Driving safely through traffic
Town driving in Castlebar and Ballinrobe, reading traffic signals and crossings.
Lesson notes
What the lesson covers: Navigating urban congestion, compliance with yellow box junctions, reading multi-phase traffic signals, and maintaining situational awareness around buses and deliveries.
Practice between lessons: 3 hours: Supervise urban driving during peak school and shopping hours, focusing on calm junction negotiation.
Local roads: Castlebar town centre circuit (The Mall, Spencer St, Ellison St).
Module 09
Changing direction (Advanced & Test Manoeuvres)
Turn in the road (three-point turn), reverse around corner, and hill starts.
Lesson notes
What the lesson covers: Turnabout between kerbs without touching kerbs, reversing around a left corner keeping 0.3-0.5m kerb margin for 3 car lengths, and hill start with zero rollback.
Practice between lessons: 3 hours: Dedicated low-speed clutch control drills in quiet residential areas. Emphasize continuous 360° observations.
Local roads: Garryduff estate corner reverse & Abbey Street incline in Ballinrobe.
Module 10
Speed management
Speed limits, adjusting for road curvature, weather, and wet braking distances.
Lesson notes
What the lesson covers: Complying with statutory speed limits (30, 50, 60, 80, 100 km/h), recognizing gateway speed transition signs, and decelerating before entering lower speed zones.
Practice between lessons: 3 hours: Watch for gateway speed signs entering villages (e.g. 80 down to 50 km/h); vehicle must be at 50 km/h *before* the sign.
Local roads: Neale Road entrance into Ballinrobe & Breaffy Road 50 km/h gateway.
Module 11
Challenging conditions
Darkness, heavy rain, fog, surface water, glare, and proper lighting usage.
Lesson notes
What the lesson covers: Driving in Atlantic rainstorms, avoiding aquaplaning on surface water, using dipped headlights and fog lights (<100m visibility), and coping with oncoming glare.
Practice between lessons: 3 hours: Mandatory night driving and wet-weather driving practice on unlit regional routes.
Local roads: Unlit Mayo secondary roads between Kilmaine, Ballinrobe, and Castlebar.
Module 12
Independent driving
Navigating routes following road signs, simulated mock test, and test preflight.
Lesson notes
What the lesson covers: Autonomous route navigation following destination signs, completing a full 40-minute driving test simulation with zero verbal prompts, and pre-test calming routines.
Practice between lessons: 3 hours: Conduct full mock test circuits where the sponsor gives directions only as an examiner would ('turn left at the next junction').
Local roads: Full Castlebar RSA test route departure from Breaffy House Resort (Breaffy Road, N60, Eircode F23 X863).
Three stages
Lessons 1–4, then 5–8, then 9–12.
Quiet roads around Kilmaine first. Then busier roads. Then the Castlebar circuit from Breaffy House.
Three stages of the 12 lessons
Kilmaine roads, then the N60, then Castlebar
Watch the space beside the car
Tier I · Modules 01–04 (12 Hours Practice)
Cockpit Ergonomics & Primary Vector Control
Establishes the 1.0-metre nearside kerb envelope, friction-point clutch equilibrium in the dual-control Kia Ceed, and early MSPSL mirror-signal cascades across Kilmaine and the N60 corridor.
Tier II · Modules 05–08 (12 Hours Practice)
Multi-Lane Roundabout & Dynamic Hazard Cones
Builds 12–15 second forward visual scanning, Moneen and Station Road spiral roundabout lane discipline, 1.5-metre rural cyclist clearance, and yellow-box junction compliance in Castlebar town traffic.
Tier III · Modules 09–12 (12 Hours Practice)
3D Reversing Geometry & Autonomous Exam Circuit
Consolidates the 0.3–0.5m left-corner reverse over 3 car lengths, 3-move turnabout between kerbs, zero-rollback gradient start, Atlantic night/rain beam control, and full 40-minute mock test departure from Breaffy House.
Before the car
Manoeuvres, hill starts, and roundabouts.
Use these before a lesson. They show the shape of the move. They do not replace the hour in the car.
Loading interactive 3D driving & 59 test-centre simulator...
The moves on the test
Look at the move, then the space around the car
Reverse around a corner, turnabout, roundabouts, hill start, bay park, parallel park, and the emergency stop. Castlebar and Ballinrobe roads are in the same set. The picture supports the lesson. It does not replace it.
Bring the vehicle to a prompt and controlled halt from ~45 km/h on tester command, maintaining strict directional stability without skidding or early clutch coasting.
Step 1: Immediate Progressive Footbrake
At the examiner's verbal command 'STOP!', instantly apply firm, progressive pressure to the footbrake. Keep both hands firmly on the wheel at 9-and-3.
Step 2: Maintain Straight Trajectory
Do not stamp violently or pump the pedal. Retain straight-line steering without swerving or locking wheels while the car decelerates rapidly.
Step 3: Timed Clutch Disengagement
Depress the clutch pedal firmly just before the vehicle comes to a complete halt to prevent engine stall. Avoid dipping the clutch early (coasting).
Step 4: Securing & 360° Safety Scan
Apply the handbrake firmly and select neutral. Release foot pedals. Conduct a rigorous 360° safety observation (mirrors and both blind spots) before moving off.
Practice note: Controlled stop
Brake smoothly, avoid locking the wheels, and secure the car before you move off again. This note does not quote a fault grade.
9. Castlebar practice (Station Road and a 30 km/h zone)
Practice sketch
A practice sketch of Station Road, a slower zone on Spencer Street, and giving way at a zebra crossing. It is not a map of the roads an examiner will use.
Step 1: The Mall Departure Gate
Execute POM routine departing Government Buildings. Progressive acceleration to 50 km/h with 360° observations.
Step 2: Station Rd Roundabout
Yield to traffic from right. Apply 12 o'clock rule: left lane approach, indicate left after passing exit 1.
Step 3: Spencer St 30 km/h Zone
Decelerate smoothly before the 30 km/h gateway sign. Scan pedestrian crossings early and yield to foot traffic.
Step 4: Garryduff Reverse & Return
Execute reverse around corner into Garryduff with zero kerb strike. Maintain lane discipline returning to centre.
Practice note: Castlebar
Slow down before a 30 km/h zone, and move when the gap at the roundabout is there. This note does not quote a fault grade.
10. Ballinrobe practice (Neale Road and Abbey Street)
Practice sketch
A practice sketch of slowing for the Neale Road town signs, a tight corner, and a hill start on Abbey Street. It is not a map of the roads an examiner will use.
Step 1: Neale Rd Speed Gate
Engine braking and progressive footbrake down from 80 to 50 km/h well before the town boundary sign.
Step 2: Church St Heritage Corner
Walking pace clutch control around tight blind corners, scanning rear blind spots for pedestrians on narrow footpaths.
Step 3: Abbey Street hill
Find the bite before you release the handbrake. Avoid rolling back. This note does not promise the result.
Step 4: Main St Roundabout & Bay Park
Decisive lane positioning and signals at mini-roundabouts. Smooth outward bay park return to test centre.
RSA Marking: Ballinrobe Route
Slow down before the town speed signs on the Neale Road. On Abbey Street, avoid rolling back. These are practice notes, not a quoted marking scheme.
Loading 3D Hill-Start & Gradient Physics Simulator...
🔄 Roundabout lanes and signals
Practise a roundabout.
Choose a lane, check the mirrors, and signal for the exit. Moneen in Castlebar is the multi-lane example.
INDICATOR
OFF
SPEED
24 km/h
GEAR
2nd Gear
Phase 1 of 4 · 2nd Exit
Approach in Left Lane (No Signal)
Official RSA Procedure
Check interior and left mirrors. Do NOT indicate on approach for straight ahead (12 o’clock). Stay in the left-hand lane unless road arrows specify otherwise.
👀 Mandatory Mirror Checks at this Point:
Interior MirrorLeft Wing Mirror
Examiner Test TrapGrade 2
Signaling on approach for a straight exit is a classic mistake that confuses traffic waiting at the 1st exit.
Grade 2 for giving a misleading signal (e.g. indicating left on approach or indicating right).
Castlebar roads
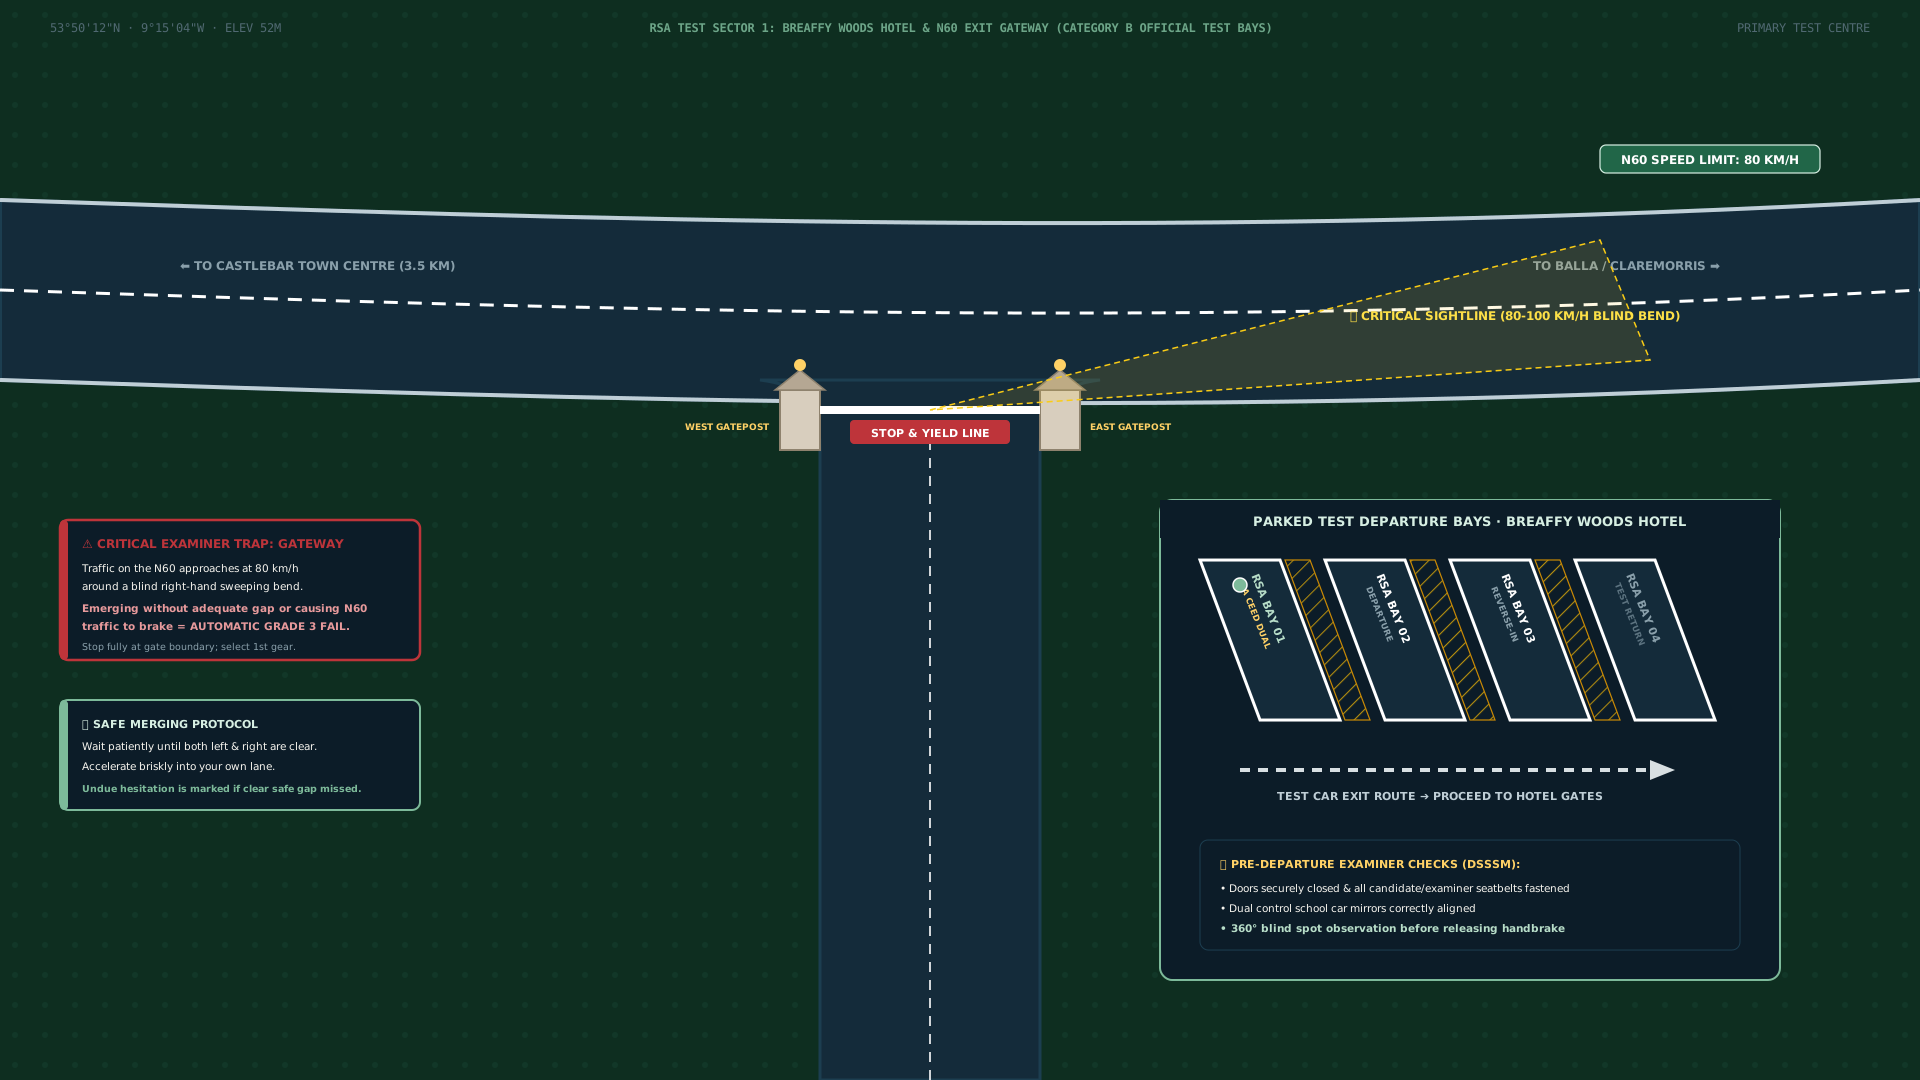
Turns from Breaffy House.
Six parts of the Castlebar roads, starting at Breaffy House. Use it to see the junction before the lesson. It is not a live navigation feed.
Part 1 of 6
Breaffy House Hotel N60 Exit Gateway
Breaffy, Castlebar (Official Test Start / Departure Gate)
80
Target Gear
1st Gear
INDICATOR:◀▶
🗺️ Breaffy departure bays
JACQUELINE MORAN SAFE DRIVING · ADI 34687
L
KIA CEED DUAL CONTROLS
School car
Dual-Control Safety System:
Dual controls in the school Kia
Examiner direction, part 1
“At the end of the avenue at the main road, I'd like you to turn left onto the N60 towards Castlebar.”
Dipped headlights when someone is coming towards you. Fog lights only when you cannot see 100 metres. In the wet, leave about four seconds.
Rule 01 · Dipped vs Main Beam
Anti-Dazzle Protocol on Unlit Mayo Roads
Use main beam on unlit rural roads (R311, N60) only when clear ahead. Dip immediately for oncoming traffic, when following behind another vehicle, in built-up street-lit zones (Castlebar 50 km/h), or when approaching cyclists and pedestrians.
Rule 02 · Fog & Falling Snow
100-Metre Fog Lamp Statutory Threshold
Never use full main beam in dense fog or heavy rain as water droplets reflect glare back into your eyes. Switch on front/rear fog lamps only when visibility drops below 100 metres, and switch them off immediately once visibility clears.
Rule 03 · Standing Water & Grip
Aquaplaning Recovery & 4-Second Wet Gap
Double your following distance from 2 seconds to at least 4 seconds in wet Mayo weather (10 seconds on icy surfaces). If tyres aquaplane on standing water, hold the steering wheel straight, ease off the accelerator smoothly, and never brake harshly.
Supervised Practice Guidelines
Practice between lessons.
Accompanied practice between EDT lessons is recommended, often described as about 3 hours with a full licence holder for each 1-hour lesson. Check the current RSA page for the figure that applies to you. It is not a separate legal minimum on top of the 12 lessons.
Four jobs for the accompanying driver
Under Irish law (Road Traffic Acts), a learner driver must always be accompanied by a person holding a full, valid Category B licence for at least 2 continuous years. The sponsor is not a passive passenger — they are a vital safety co-driver.
1. Calm Verbal Environment
Never yell, seize the steering wheel unexpectedly, or introduce sudden panic. Deliver calm, early directions ("At the roundabout ahead, we will take the second exit") giving at least 100m notice.
2. Practice Signed-Off Skills Only
Do not attempt complex multi-lane junctions or rural night driving until Jacqueline has formally signed off those modules in the learner's RSA MyEDT logbook. Consolidate current habits.
3. Route Progression Strategy
Follow a graduated progression: begin on quiet South Mayo secondary boreens (Kilmaine, Hollymount), progress to regional links (R311, N60), and culminate in Castlebar peak-time town circuits.
4. Written Logbook Reflection
Spend 5 minutes after every practice drive completing the official RSA Learner Logbook reflection sheet. Note down questions or recurring hesitation for Jacqueline to address at the next EDT session.
Your record
Tick off the 12 lessons.
See which lesson you are on, then check MyEDT for what has actually been recorded. Allow time for a recent lesson to appear.
Your record
Tick off the 12 lessons
Most learners do all 12, one hour each, with an approved instructor, and the lesson is recorded in MyEDT. Reduced EDT is six lessons, and only after it is approved. Open a lesson for what it covers and what to practise between lessons.
Identification of dashboard warning lamps (ABS, airbag, check engine, battery)
📍 Mayo Test Centre Relevance
Tested at the start of your Category B test before leaving the Castlebar RSA Driving Test Centre at Breaffy House Resort (Breaffy Road, N60, Eircode F23 X863).
🚗 Sponsor Practice Milestone
Practise cockpit drills until adjustments take under 60 seconds.
EDT 2Correct Positioning 1Straight line road positioning, lane discipline, and clearance margins▾
📋 Key Statutory Competencies:
Maintaining central lane discipline between centre line and road verge
Adhering to the 1-metre safe door clearance rule when passing parked vehicles
Lane discipline on Mayo regional routes (N5, N59, N60 approaches)
Continuous mirror observation (interior, exterior left and right) before position adjustments
📍 Mayo Test Centre Relevance
Evaluated along wide two-way roads like Breaffy Road and Station Road in Castlebar.
🚗 Sponsor Practice Milestone
Drive along local straight roads focusing on relaxed hands and stable road centering.
EDT 3Changing Direction 1MSPSL routine for standard left and right turns at T-junctions▾
📋 Key Statutory Competencies:
Mirrors (interior and relevant door mirror) well ahead of turn
Signal timed to inform without misleading other road users
Position: left for left turns; just left of the centre line for right turns
Speed control: 2nd gear deceleration and smooth clutch bite without coasting
Look: final observations before turning, giving way to oncoming traffic and pedestrians
📍 Mayo Test Centre Relevance
Junction turns off Springfield and Newport Road into residential estates.
🚗 Sponsor Practice Milestone
Repeated left and right turns into quiet residential avenues using the full MSPSL sequence.
EDT 4Progression ManagementAppropriate speed, smooth acceleration, and progressive gear selection▾
📋 Key Statutory Competencies:
Progressing up to the statutory speed limit when conditions and visibility permit
Smooth gear changes without rev flare, lurching, or looking down at the gearstick
Progressive braking: gentle initial press, firm middle, and light release before stopping
Maintaining a 2-second gap in dry weather and a 4-second gap in Mayo rain
📍 Mayo Test Centre Relevance
Speed transitions from 50 km/h town zones to 80 km/h and 100 km/h Mayo bypass sections.
🚗 Sponsor Practice Milestone
Practise smooth 2nd → 3rd → 4th upshifts and anticipating braking zones early.
Repeated entries and exits on multi-lane roundabouts from various entry points.
EDT 12Independent Driving & Test ReadinessIndependent navigation, road signage following, and final mock test composure▾
📋 Key Statutory Competencies:
Following multi-destination road signs independently for 10-15 minutes
Composure under test conditions: recovering calmly if a wrong turn is safely taken
Complete mock test audit covering all Category B competencies with Jacqueline Moran
Final review of MyEDT logbook uploads before practical test scheduling
📍 Mayo Test Centre Relevance
Full 35-40 minute practical mock test simulating official Castlebar test routes.
🚗 Sponsor Practice Milestone
Independent 30-minute drives following signs to Westport, Ballinrobe, or Claremorris.
● 12 Hours Mandatory ADI Tuition with Jacqueline Moran● ~36 Hours Supervised Sponsor Practice Recommended● Verified on the official RSA MyEDT Portal
🤝 Official RSA Sponsor & Accompanied Driver Practice Hub
Accompanied Driver Sponsor & Co-Pilot Guide.
The RSA recommends accompanied practice between Essential Driver Training lessons. Check the current official guidance for the hours that apply to you. Jacqueline Moran (ADI 34687) wrote this guide to help parents, partners, and sponsors practise calmly.
Category B driving instruction · RSA register
Calm rules for the passenger seat
Accompanied practice works better when the passenger stays calm. These are practical reminders for a driving lesson, not a clinical treatment.
⏱️
1. The 3-Second Advance Notice Rule
Never say "Turn right here!" at the corner. Always give directions 100 metres in advance: "At the upcoming crossroads, we will be taking the right turn toward Balla." This gives the learner time to complete the full MSPSL mirror-signal-position sequence.
🗣️
2. Low Pitch, Measured Cockpit Voice
Sudden sharp gasps, stamping phantom passenger brakes, or grabbing the roof grab-handle instantly spikes the learner's heart rate. Keep your vocal tone neutral and measured, even when correcting a mistake.
🛡️
3. De-escalating Sudden Panic
If the car stalls at a busy junction and horns beep behind, do NOT shout. Direct the exact physical sequence: "Handbrake on. Clutch down into neutral. Key back and restart. Take your time."
🎯
4. The 3:1 Post-Drive Debrief
When turning the engine off, never unleash a list of 10 faults. Praise THREE things handled well (e.g. smooth gear change, pedestrian yield, good speed) before discussing ONE skill to refine on the next drive.
How long the car takes to stop
Stopping distances.
Thinking distance, then braking distance. Dry, wet, greasy, and ice are different. Pick a speed and read the gap.
When you are asked to stop
The emergency stop
Brake firmly, keep the car straight, and look around before you move off again.
Grade 1 (Minor): Slight late braking or jerky stop without passenger distress.
Grade 2 (Serious): Repeated harsh braking, coasting with clutch depressed, or failing to anticipate red lights.
Grade 3 (Dangerous): Skidding, wheel lockup into junctions, or requiring instructor dual-brake intervention (immediate fail).
Official RSA Reference: Rules of the Road — Speed and Stopping Distances (Page 134)Instructor: Jacqueline Moran (ADI 34687)
Watch first
The walkaround and a lesson.
Two films: the checks around the car, and how a lesson is taught. Captions are on.
Lesson slides · English captions
Category B draft slides & captions.
These two clips are draft slide aids with English captions taken from the words on screen. They are not an official RSA production and they are not a film of a Castlebar test route. Check the current official guidance before a lesson with Jacqueline Moran (ADI 34687).
Category B test day: a five-part check before you set off1 min 10 sec · draft slides
Draft slides, not an official RSA film. They cover the permit and current document requirements, a vehicle check, visibility, and scan-predict-plan-act-review. Check the current official guidance before you rely on the checklist.
Key Test Day Takeaways:
Confirm the permit and the training or waiting conditions, then the current RSA document and insurance requirements for this vehicle.
Check doors, seats, belts, mirrors, windows, wipers, demisters, horn, indicators, brake lights, tyres and warning lights before moving.
The slides say to scan, predict, plan, act and review, and to check current official guidance before relying on the checklist.
Jump to Video Chapter (5 Timestamps):
✓ Dual-control Kia Ceed
Ask about lessons in Jacqueline Moran's Kia Ceed
Manual lessons are €70 an hour. Two hours are €140. Test-car hire is €250, plus one separately charged pre-test lesson. This page does not sell a package.
Jacqueline Moran (ADI 34687) teaches driving lessons at a calm pace, with clear explanations and time for questions. This driving website does not provide a clinical service and does not promise a result. Tír na nÓg Therapy is a separate website.
€250 car hire plus one separately charged €70 pre-test lesson, mainly Castlebar. Jacqueline confirms you can drive the car safely before agreeing hire.
You are in the right-hand seat of the school Kia. Jacqueline sits on your left in a lesson. Use Back and Next for the 15 practices, then the large buttons. This is practice on the page. It does not give a test result.
1 of 15Moving off
Speed0GearNeutralHandbrakeOnLimit50
Select first, release the handbrake, and move off when the road is clear.
Move off releases the handbrake and pulls away in first. Stop waits until the car is still, then puts the handbrake on.
ClutchUp
BrakeOff
AcceleratorOff
What to remember
Look all around, including over your right shoulder, before the car moves.
Have a go
Select first, release the handbrake, and move off when the road is clear.
Easy to miss
Missing the shoulder check, or letting the clutch up so the car jumps.
All 15 practicesLook under the bonnet
Pull the release inside the car, then the catch under the front edge, before you look. Say what you can see.
1. Engine oil
With the car level, take the dipstick out, wipe it, put it back fully, then read it. The level belongs between the marks. Top up with the oil named on the filler cap.
2. Brake fluid
The level in the translucent tank belongs between MIN and MAX. Keep the cap sealed.
3. Coolant
Check the tank when the engine is cold. The level belongs between MIN and MAX. Never open a hot cap.
4. Washer fluid
The cap has a windscreen symbol. Top it up with screenwash.
5. Steering
After you start the engine, the steering light should go out and the wheel should turn freely.
6. Battery
The battery is clamped down. The terminals are tight and free of crust.
7. Tyres
You need at least 1.6 mm of tread across the centre three quarters, with no damage on the side. Read the pressures on the sticker in the driver's door, with the tyres cold.
8. Headlights
Switch the dipped headlights on and check both sides.
9. Horn
Press the centre of the wheel. Use the horn only to warn of danger.
10. Demister
Use the front demist, the heated rear window and the air conditioning to clear the glass.
If the picture moves too fast
This only slows the road in the picture. The speed on the dial stays the same.
Three grades
What fails the test.
Understand exactly how RSA examiners evaluate Category B driving tests in Castlebar, from minor Grade 1 faults to serious Grade 2 and dangerous Grade 3 faults.
Grade 1 • Minor
Minor Driving Faults
A minor fault. It is recorded for feedback and does not, on its own, fail the test.
Primary Focus Areas:
Smooth clutch control and progressive acceleration on Castlebar urban gradients.
Early mirror checks prior to signaling or altering road speed.
Proper hand positioning without crossing arms excessively over the steering wheel.
Grade 2 • Serious
More Serious Driving Faults
A more serious fault. The result is a fail at 9 or more Grade 2 faults in total, 4 Grade 2 faults for the same aspect, or 6 Grade 2 faults under the same heading.
Critical Test Pitfalls:
Blind spot observation checks before moving off or changing lanes on the N5 roundabout approach.
Incorrect lane selection and signal timing at multi-lane Castlebar roundabouts.
Hesitation at busy stop junctions or yielding opportunities on Breaffy Road.
Grade 3 • Dangerous
Dangerous Driving Faults
An action or inaction involving direct danger to traffic, pedestrians, or property, or requiring examiner physical or verbal intervention. A single Grade 3 fault results in an immediate fail.
Immediate Intervention Triggers:
Failing to yield right-of-way to oncoming traffic when turning right across traffic lanes.
Disregarding pedestrian crossings, solid stop lines, or amber/red traffic signals.
Rolling backwards on steep hill starts or encroaching onto pedestrian walkways.
Castlebar
On the day.
Structured preparation covering test-centre staging at Breaffy House Hotel, under-bonnet oral checks, and flawless low-speed manoeuvres.
Centre Protocol
Breaffy House Hotel Staging
Arrive 15 minutes prior to your allocated slot at the Castlebar RSA testing centre (Breaffy House Hotel). Ensure tax, insurance, NCT discs, and L-plates are clean and valid.
Pre-Departure Checks:
Learner permit presentation and signature verification.
In-car secondary controls: demister, hazard lights, wipers, and horn.
Oral technical questions covering rules of the road, road signs, and speed limits.
Technical Knowledge
Under-Bonnet Oral Checks
The examiner will request you to open the bonnet and identify or explain how to check essential fluid levels and vehicle safety components.
Examiner Demonstration Points:
Engine oil level dipstick (minimum and maximum graduation marks).
Tyre minimum legal tread depth (1.6mm across central 3/4) and pressure assessment.
Precision Driving
Test Manoeuvres & Reversing
Practice can include a turnabout, a reverse around a corner, and a hill start. Keep looking around. Nothing here promises a result.
Core Evaluation Components:
Turnabout across the roadway in three smooth movements without touching kerbs.
Reverse around a corner maintaining steady 18-inch kerb clearance with blind spot checks.
A hill start with the handbrake. Avoid rolling back.
Castlebar RSA Test Centre · Breaffy House Resort (F23 X863 · 53.8378° N, -9.2458° W)
The hour before you leave Breaffy
Park so you can drive straight out
T-60 Mins · Warm-Up Drive
1-Hour Pre-Test Calibration
Meet Jacqueline in Castlebar to settle nerves, rehearse clutch bite-point on a gradient, complete one left-corner reverse, and verify L-plates, tax, NCT, and insurance discs.
T-15 Mins · Bay Staging
Reverse Into Breaffy Bay 01–04
Reverse cleanly into the designated RSA candidate parking bay at Breaffy House Hotel (F23 X863) so your car faces outwards for an unobstructed, low-stress forward departure.
T-05 Mins · Waiting Room & Oral
Permit Verification & Theory
Present your physical Category B Learner Permit to the examiner, answer 5–8 oral Rules of the Road & road sign questions, and walk out to the vehicle for bonnet and light checks.
T-00 Mins · Bay Departure
DSSSM, Secondary Controls & POM
Demonstrate demisters, wipers, and hazard lights in the cabin, complete a full 360° blind-spot sweep (POM), indicate if required, and emerge smoothly onto the N60 Breaffy Road.
The record
How a lesson is recorded.
Digital synchronization of your 12 EDT modules to the official RSA portal alongside structured sponsor practice hours for rapid test booking eligibility.
ADI Verification
Official RSA Portal Upload
Following each completed session, Jacqueline Moran uploads your session competencies directly to the RSA MyEDT database, stamping module completion securely.
Digital Record Integrity:
Same-day digital lesson sign-off accessible via your learner MyEDT account.
Progress tracking against the official Category B competency framework.
Instant eligibility unlocking for practical test date selection upon module 12 sign-off.
Private Practice
Sponsor Logbook Hours
The RSA strongly recommends a minimum of 3 hours of supervised private driving practice with an approved sponsor between each professional EDT lesson.
Sponsor Collaboration Plan:
Clear written practice objectives provided to your sponsor after each lesson.
Desensitization to examination pressure and examiner instruction cadence.
Final confidence boost ensuring you arrive composed and fully prepared.
Questions
About the 12 lessons and the test.
Direct answers on mandatory RSA Essential Driver Training (EDT), sponsor practice hours, Reduced EDT exemptions, MyEDT portal sign-offs, and Castlebar test-car hire at Breaffy House Hotel.
How many mandatory Essential Driver Training (EDT) lessons are required in Ireland?+
All first-time Category B learner permit holders in Ireland must complete 12 mandatory 1-hour Essential Driver Training (EDT) modules with an RSA Approved Driving Instructor (ADI), uploaded to the official RSA MyEDT portal.
Link to this answer #How many hours of supervised sponsor practice are recommended between EDT lessons?+
Accompanied practice between the 12 EDT lessons is recommended. A common guide is about 3 hours with someone who has held a full Category B licence for at least 2 years, for each 1-hour lesson. Check the current RSA page for the figure that applies to you. The 12 lessons themselves are the training that is recorded in MyEDT.
Link to this answer #Who qualifies for the Reduced 6-Lesson EDT programme in Ireland?+
Holders of a valid full foreign driving licence from a non-exchange country may apply to the RSA for approval to complete a Reduced 6-Lesson EDT syllabus (covering Modules 1, 5, 6, 7, 9, and 10). Reduced EDT is not automatic and requires an official RSA exemption letter before starting.
Link to this answer #When are completed EDT lessons uploaded to the official RSA MyEDT portal?+
Jacqueline Moran (ADI 34687) logs completed EDT modules directly to the official RSA MyEDT online portal on the same day as your lesson, alongside stamping your physical RSA Learner Logbook so your test eligibility is never delayed.
Link to this answer #Where do Castlebar driving tests depart from and what routes are covered in the EDT plan?+
Practical driving tests in Castlebar depart from Breaffy House Hotel & Resort on the Breaffy Road (N60, Eircode F23 X863). Later EDT modules and 2-hour pre-test assessments (€140) cover Breaffy Road, Moneen multi-lane roundabout, Station Road level crossing, Spencer Street 30 km/h zones, and Garryduff residential manoeuvres.
Link to this answer #Can I hire Jacqueline's dual-control car for the practical driving test in Castlebar?+
Yes. Dual-control manual Kia test-car hire at Castlebar Test Centre (Breaffy House Hotel) is €250, or €320 combined with the required 1-hour pre-test warm-up lesson, ensuring verified NCT, motor tax, insurance compliance, and familiar clutch control.
Uses your device’s share options, or copies the canonical website address when sharing is unavailable. The site does not receive anything from this action.
2018–2019
Reviews from Facebook.
Maria Tierney, Laura O’Sullivan, Cait Fhearghail and Sinead Hession wrote these on the school’s Facebook page. Their words stay in the original posts. This school does not add a star score or a pass rate.
Hold the car, look around, then go. Do not roll back into the traffic behind you. Lessons use the hills at Breaffy and on Abbey Street in Ballinrobe.
Telemetry & Vectors
Incline: 12% (6.8°)
Gravity Pull: 1613 N
Engine Torque: 1100 N
Rollback: 0 cm
RSA Examiner Marking
Grade 0 (Clean Pass)
Vehicle safely secured by handbrake. Ready for POM routine.
Road Gradient (%)12%
-15% (Decline)0% (Flat)12% (RSA)25% (Steep)
Accelerator "Set the Gas"1400 RPM ✔ IDEAL
800 (Idle)1,400 (Sweet Spot)2,500 (High)
Clutch Pedal Position55% ★ BITE ZONE
0% (Floor)55% (Biting Point)100% (Up)
Handbrake State
Space Test Move-OffH Handbrake1 - 4 Camera Views↑ / ↓ Clutch Bite← / → Accelerator Gas
📋The Official RSA P-O-M Routine on Gradients
P - Prepare
Handbrake firmly applied. Depress clutch fully. Select 1st gear. Set the gas gently to ~1,400 RPM (steady gentle hum). Bring clutch up smoothly to the biting point. Observe the bonnet rise slightly and the engine note deepen.
💡 Bonnet lift (squat) and engine tone drop confirm torque transfer.
⚠️ Do not release handbrake before feeling the bite; doing so causes rollback.
O - Observe
Complete full 360-degree observation sweep: Interior rear-view mirror, left wing mirror, road ahead, right wing mirror, and look over right shoulder into the blind spot.
💡 Blind spot check is mandatory before handbrake release.
⚠️ Do not look down at the handbrake while observing; keep head up.
M - Move
Release handbrake smoothly while maintaining clutch at bite point. As vehicle begins to move forward without rolling back an inch, progressively feed in accelerator and gently release clutch fully.
💡 Smooth progressive handbrake disengagement with balanced footwork.
⚠️ Never rush clutch release once handbrake is down; hold bite for 2-3 metres.
📍Official County Mayo Test Gradients & Hills
Castlebar Test Centre (Breaffy House & McHale Road)
12% - 14%
Spot: Breaffy Woods Hotel Exit Incline & Railway Station Bridge
Key Challenge: Joining N60 Castlebar bypass from gradient with high-speed oncoming traffic. Requires decisive POM routine.
Jacqueline's tip: Practice the bite hold on the quieter Breaffy service slope before doing test-pace hill starts on the N60 junction.
Ballinrobe Driving Area
10% - 15%
Spot: Abbey Street Incline & Neale Road Crossroads
Key Challenge: Narrow historical street with parked cars on one side. Precise clutch bite and 360° observations mandatory.
Jacqueline's tip: Watch for pedestrian movement from shop doorways along Abbey Street while holding the bite.
Claremorris Driving Routes
11% - 16%
Spot: Church Hill & Old Knock Road Gradients
Key Challenge: Stopping on gradient behind queuing traffic at town lights. Keeping safe 1-car-length buffer from vehicle ahead.
Jacqueline's tip: Tires-and-tarmac rule: Ensure you can see the rear tyres of the car ahead touching the road.