Four steps. The rules for each one stay on the RSA or NDLS page linked from the card.
01Theory test + learner permit
The RSA route starts with the driver theory test, then a learner permit. Check the current RSA guidance for where a learner-permit holder may drive, who must accompany them, L-plates, and category-specific passenger, trailer, or other conditions.
For most car learner drivers, Essential Driver Training is 12 one-hour sessions with an Approved Driving Instructor. Eligible learners may follow reduced EDT with six sessions; only current, eligible training should be relied on and your record is checked in MyEDT.
Between lessons, practise only within the current learner-permit and supervision rules. For a car learner, that includes the RSA’s restrictions on motorway and unaccompanied driving, the accompanying-driver rules, and L-plates.
Before relying on a test date, check the six-month rule where it applies, your required EDT sessions in MyEDT, your valid permit, and the current vehicle and insurance requirements, including the certificate of motor insurance rule.
Reverse around a corner, a turnabout, parking, and the look around the car. The pictures support the lesson. They do not replace it.
The moves on the test
Look at the move, then the space around the car
Reverse around a corner, turnabout, roundabouts, hill start, bay park, parallel park, and the emergency stop. Castlebar and Ballinrobe roads are in the same set. The picture supports the lesson. It does not replace it.
Bring the vehicle to a prompt and controlled halt from ~45 km/h on tester command, maintaining strict directional stability without skidding or early clutch coasting.
Step 1: Immediate Progressive Footbrake
At the examiner's verbal command 'STOP!', instantly apply firm, progressive pressure to the footbrake. Keep both hands firmly on the wheel at 9-and-3.
Step 2: Maintain Straight Trajectory
Do not stamp violently or pump the pedal. Retain straight-line steering without swerving or locking wheels while the car decelerates rapidly.
Step 3: Timed Clutch Disengagement
Depress the clutch pedal firmly just before the vehicle comes to a complete halt to prevent engine stall. Avoid dipping the clutch early (coasting).
Step 4: Securing & 360° Safety Scan
Apply the handbrake firmly and select neutral. Release foot pedals. Conduct a rigorous 360° safety observation (mirrors and both blind spots) before moving off.
Practice note: Controlled stop
Brake smoothly, avoid locking the wheels, and secure the car before you move off again. This note does not quote a fault grade.
9. Castlebar practice (Station Road and a 30 km/h zone)
Practice sketch
A practice sketch of Station Road, a slower zone on Spencer Street, and giving way at a zebra crossing. It is not a map of the roads an examiner will use.
Step 1: The Mall Departure Gate
Execute POM routine departing Government Buildings. Progressive acceleration to 50 km/h with 360° observations.
Step 2: Station Rd Roundabout
Yield to traffic from right. Apply 12 o'clock rule: left lane approach, indicate left after passing exit 1.
Step 3: Spencer St 30 km/h Zone
Decelerate smoothly before the 30 km/h gateway sign. Scan pedestrian crossings early and yield to foot traffic.
Step 4: Garryduff Reverse & Return
Execute reverse around corner into Garryduff with zero kerb strike. Maintain lane discipline returning to centre.
Practice note: Castlebar
Slow down before a 30 km/h zone, and move when the gap at the roundabout is there. This note does not quote a fault grade.
10. Ballinrobe practice (Neale Road and Abbey Street)
Practice sketch
A practice sketch of slowing for the Neale Road town signs, a tight corner, and a hill start on Abbey Street. It is not a map of the roads an examiner will use.
Step 1: Neale Rd Speed Gate
Engine braking and progressive footbrake down from 80 to 50 km/h well before the town boundary sign.
Step 2: Church St Heritage Corner
Walking pace clutch control around tight blind corners, scanning rear blind spots for pedestrians on narrow footpaths.
Step 3: Abbey Street hill
Find the bite before you release the handbrake. Avoid rolling back. This note does not promise the result.
Step 4: Main St Roundabout & Bay Park
Decisive lane positioning and signals at mini-roundabouts. Smooth outward bay park return to test centre.
RSA Marking: Ballinrobe Route
Slow down before the town speed signs on the Neale Road. On Abbey Street, avoid rolling back. These are practice notes, not a quoted marking scheme.
Move 1
Reverse Around a Corner
Reverse into a road on the left, following the curve of the kerb smoothly at a clearance of 0.3m to 0.5m without mounting or scrubbing the pavement.
Key Routine: POM (Prepare, Observe, Move). Look mainly through the rear window; pause immediately if approaching traffic appears.
Move 2
Turnabout on the Road (3-Point Turn)
Turn the vehicle around within the boundaries of the roadway to face the opposite direction, utilizing forward and reverse gears smoothly.
Key Routine: 360° observation sweep at every stage; slow walking pace using clutch bite; avoid dry steering when stationary.
Move 3
Perpendicular & Bay Parking
Manoeuvre cleanly into a marked 90° bay or parallel parking space without crossing bay lines or hazarding adjacent vehicles or pedestrians.
Key Routine: Mirror check and blind spot check before swinging out; complete stationary handbrake and neutral check upon finishing.
Move 4
360° Blind Spots & Hazard Cones
Comprehensive shoulder and blind spot awareness across Irish right-hand drive (RHD) vehicles before moving off, changing lanes, or exiting junctions.
Key Routine: Left shoulder check before moving off from kerb; right shoulder check before lane change or exiting roundabouts.
Loading 3D Hill-Start & Gradient Physics Simulator...
Roundabouts
Lanes and when to signal.
Pick the exit you want. The picture shows the lane and when to signal. Moneen in Castlebar is one of the roundabouts used in lessons.
Approach Lane:
Left-Hand Lane (Unless road markings dictate otherwise)
Active Indicator Signal:
NO SIGNAL on approach
Examiner Watchpoint:
Holding steady lane discipline without drifting towards the centre island; timely left exit indicator after passing Exit 1.
Common Test Faults:
Signalling right on approach (misleads following traffic); signalling left too early before passing exit 1.
Unsure about Castlebar roundabouts? Book a 2-hour pre-test route lesson in the dual-control Kia Ceed with Jacqueline Moran.
Choose a lane, check the mirrors, and signal for the exit. Moneen in Castlebar is the multi-lane example.
INDICATOR
OFF
SPEED
24 km/h
GEAR
2nd Gear
Phase 1 of 4 · 2nd Exit
Approach in Left Lane (No Signal)
Official RSA Procedure
Check interior and left mirrors. Do NOT indicate on approach for straight ahead (12 o’clock). Stay in the left-hand lane unless road arrows specify otherwise.
👀 Mandatory Mirror Checks at this Point:
Interior MirrorLeft Wing Mirror
Examiner Test TrapGrade 2
Signaling on approach for a straight exit is a classic mistake that confuses traffic waiting at the 1st exit.
Grade 2 for giving a misleading signal (e.g. indicating left on approach or indicating right).
Castlebar roads
Turns from Breaffy House.
Six parts of the Castlebar roads, starting at Breaffy House. Use it to see the junction before the lesson. It is not a live navigation feed.
Part 1 of 6
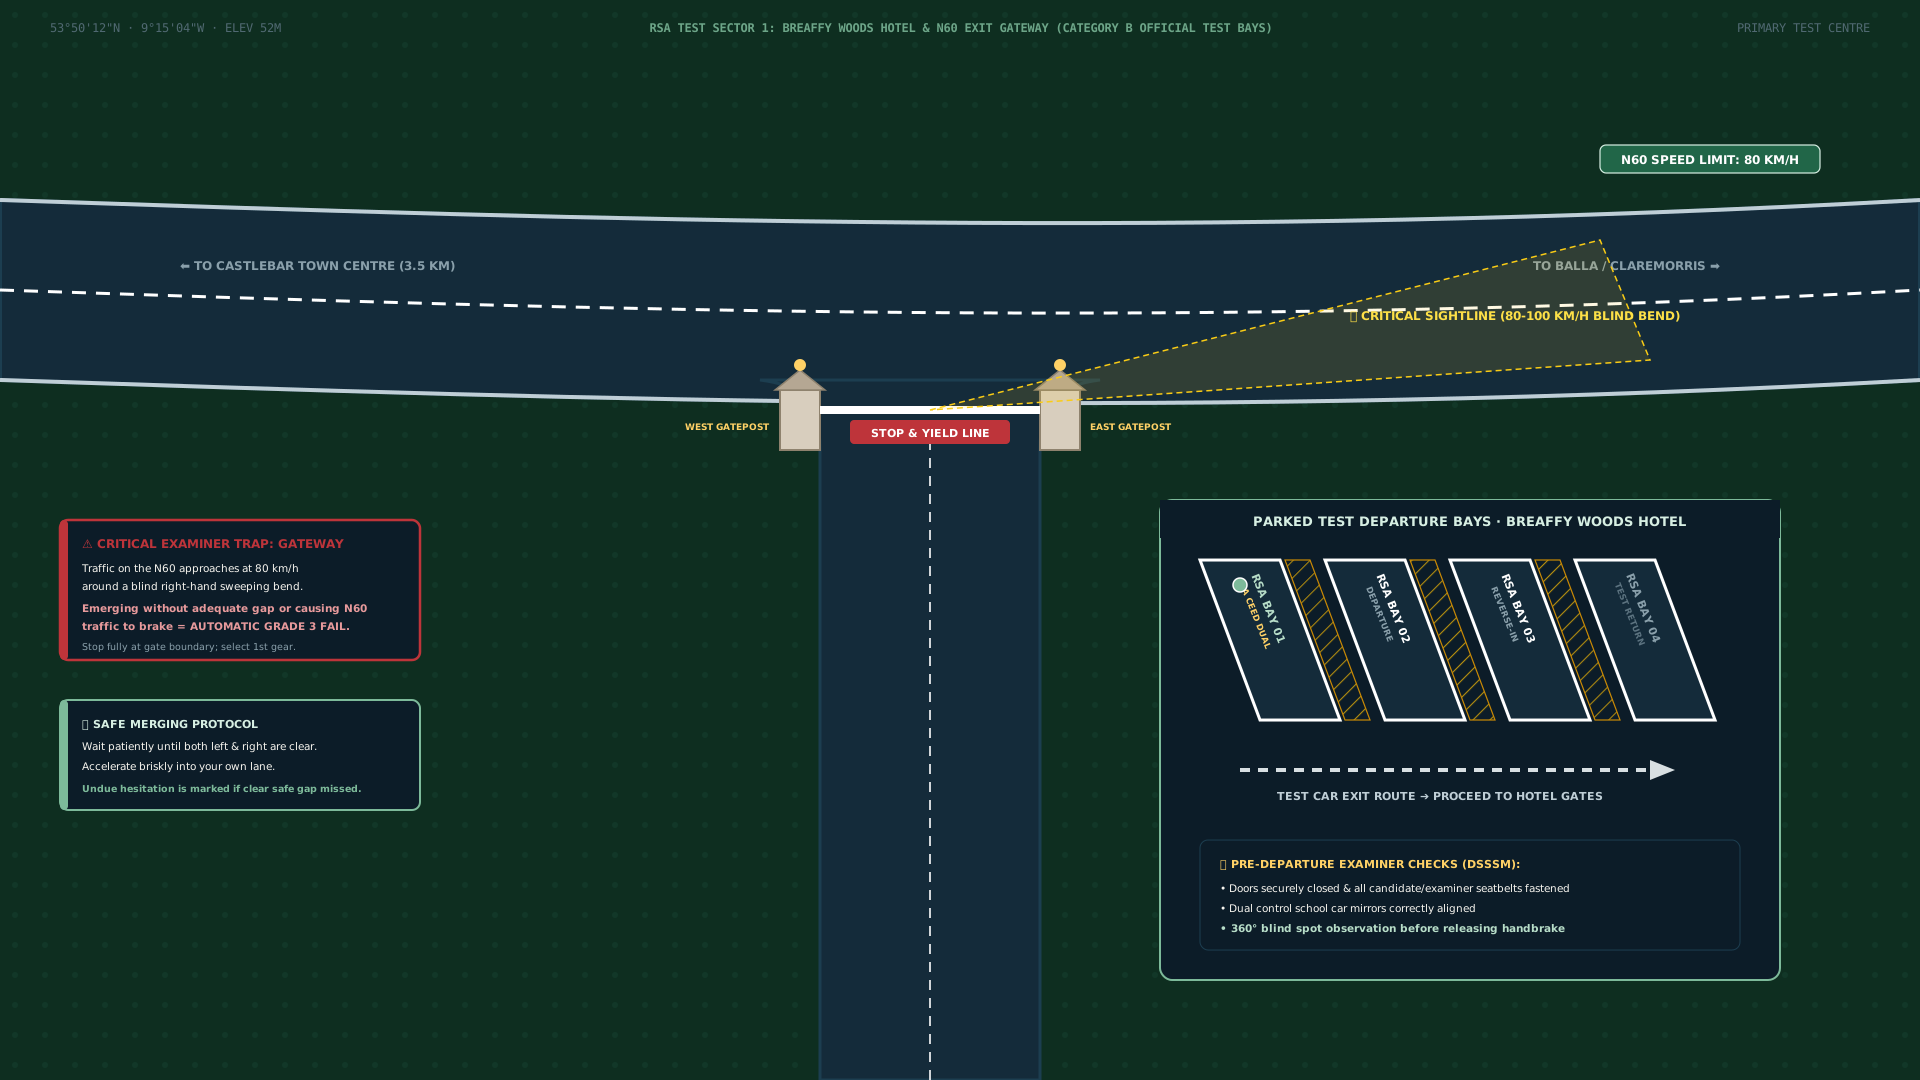
Breaffy House Hotel N60 Exit Gateway
Breaffy, Castlebar (Official Test Start / Departure Gate)
80
Target Gear
1st Gear
INDICATOR:◀▶
🗺️ Breaffy departure bays
JACQUELINE MORAN SAFE DRIVING · ADI 34687
L
KIA CEED DUAL CONTROLS
School car
Dual-Control Safety System:
Dual controls in the school Kia
Examiner direction, part 1
“At the end of the avenue at the main road, I'd like you to turn left onto the N60 towards Castlebar.”
Official Address: An Sportlann, Mitchells GAA Club, McHale Road, Castlebar, Co. Mayo, F23 Y990
Coordinates: 53.85452° N, -9.28491° W
🧭 Test Route Guidance: Departs Breaffy House Resort on Breaffy Rd (N60, Eircode F23 X863). Key watchpoints: Station Rd roundabout, Spencer St 30 km/h zone, and Garryduff reverse around corner.
Showing 59 of 59 RSA Test Centres
Carlow
Carlow
Church Street, Graiguecullen, Co. Carlow, R93 T3H1
Government Offices, The Murrough, Wicklow, Co. Wicklow, A67 K039
RSA Marking Guidelines · Category B
How a move is marked
One Grade 3 fails the test. So do 9 or more Grade 2 faults in total, 4 for the same aspect, or 6 under the same heading. A Grade 1 on its own does not.
The 3-Tier RSA Fault Grading System
Grade 1 (Minor Fault)
A minor deviation from ideal driving technique that does not compromise road safety or inconvenience other road users.
Threshold: No specific numerical limit; however, numerous Grade 1 faults reflect an inconsistent driving standard and will invite closer examiner scrutiny.
Grade 2 (Serious Fault)
A significant error that could potentially affect the safety or convenience of other road users, pedestrians, or vehicle occupants.
Threshold: FAIL CONDITIONS: 4 or more Grade 2 faults for the same driving aspect; OR 6 or more Grade 2 faults under the same heading; OR 9 or more Grade 2 faults in total across the entire test.
Grade 3 (Dangerous Fault)
An action or omission that causes actual danger or potential imminent danger to any road user, or requires examiner intervention.
Threshold: FAIL CONDITIONS: Exactly 1 Grade 3 fault results in an immediate test failure and premature test conclusion.
Mandatory Practical Manoeuvres
Turnabout in the Road (3-Point Turn)
Technique: Position car on the left, apply handbrake, select 1st gear. Complete 360° observation sweep (both blind spots). Move off slowly using clutch bite while turning steering wheel briskly towards right kerb. Stop 0.5m before right kerb with handbrake, select reverse, re-check 360°, steer left across to opposite kerb. Select 1st gear, final 360° check, and drive away smoothly in new direction.
Common Pitfalls: Touching or striking the kerb; failing to check blind spots before reversing; dry steering while stationary; rushing clutch release causing a stall.
Marking Severity: 1 Grade 3 (mounting kerb/danger) or Grade 2 for observation omission.
Reverse Around a Corner to the Left
Technique: Drive past corner, position parallel approximately 0.5m from kerb and 2-3 car lengths ahead. Select reverse gear, complete 360° observation sweep. Reverse slowly looking primarily through rear window with glances at left mirror. Guide vehicle around kerb contour maintaining 0.3m to 0.5m consistent margin. Continue straight for 3 car lengths in minor road.
Common Pitfalls: Swinging vehicle front out across oncoming traffic; mounting or scrubbing the kerb; failing to pause when vehicles or pedestrians approach from any angle.
Marking Severity: Grade 3 for mounting kerb or swinging wide into oncoming traffic; Grade 2 for steering or observation faults.
Hill Start / Gradient Moving Off
Technique: Bring vehicle to standstill on gradient with footbrake, secure handbrake, select 1st gear. Set engine revolutions slightly above idle (1200-1500 RPM). Bring clutch up smoothly until vehicle bonnet rises slightly (biting point). Complete mirror and right-shoulder blind spot check. Release handbrake smoothly; car moves forward without rolling backward.
Common Pitfalls: Releasing handbrake before clutch reaches bite, resulting in backward rollback; over-revving engine or dropping clutch rapidly causing engine stall.
Marking Severity: Rolling back more than 15cm is an immediate Grade 2; rolling back into following traffic is an immediate Grade 3 failure.
Perpendicular / Bay Parking
Technique: Approach designated test centre bay in 1st gear. Apply MSM routine, swing out slightly to create 90-degree turning angle, steer smoothly into centre of bay. Straighten wheels, stop smoothly before barrier or kerb, engage neutral and secure handbrake.
Common Pitfalls: Parking over the marked white bay lines; straddling two bays; failing to check mirrors before swinging wide.
Marking Severity: Grade 2 for poor positioning outside lines; Grade 3 if hazarding parked cars or pedestrians.
Parallel Parking (Kerbside Reversal)
Technique: Drive alongside target vehicle with 1 metre lateral clearance, aligning rear bumpers. Select reverse gear and perform full 360° observation sweep (including right blind spot). Reverse straight until rear axle aligns with target car's bumper, then apply 1 brisk turn of steering towards the kerb (45° angle). As front passenger wheel clears the target car's bumper, steer briskly away from the kerb to bring vehicle parallel within 30-45 cm. Secure with handbrake and select neutral.
Common Pitfalls: Approaching too close (<0.8m) to parked vehicle; failing to check right blind spot before swinging front out; touching or mounting the kerb; finishing further than 50cm from the kerb.
Marking Severity: Mounting or bumping the kerb is an automatic Grade 3 test failure; parking >50cm from kerb or taking more than 2 shunt corrections is a Grade 2 fault.
Emergency Stop (Simulated Hazard Halt)
Technique: Upon examiner's signal, immediately release accelerator and apply footbrake firmly and progressively without snatching the steering wheel. Depress clutch pedal just before vehicle comes to a complete halt to prevent engine stall. Secure handbrake, select neutral, take a calming breath, and check all mirrors before moving away.
Common Pitfalls: Depressing clutch before footbrake (coasting); skidding tyres due to violent snatching; failing to check 360° before moving off again.
Marking Severity: Grade 2 for delayed reaction or uncontrolled braking.
How far the car takes to stop
Thinking distance plus braking distance
You travel while you notice the hazard, then again while the brakes work. Wet roads need more room. Leave about two seconds in the dry and about four seconds in the wet.
Thinking Distance
dthink = v · treaction
Assumes 0.7s human perception-reaction
Braking Distance
dbrake = v² / (2 · μ · g)
Quadratic speed increase; g = 9.81 m/s²
Mayo Rule of Thumb
2-Second → 4-Second Gap
Double your distance on wet roads
Interactive Physics Lab
Select Vehicle Speed & Road Surface
Speed: 50 km/h (13.9 m/s)
Select Mayo Road Surface Condition:
Wet Mayo Rain · 50 km/h ResultRisk: Moderate · ~7.4 Car Lengths
Thinking Distance (0.7s)
10 m
Braking Distance (μ=0.45)
22 m
Total Stopping Distance
32 m
0 mThinking: 10 m | Braking: 22 m | Total: 32 m
Local RSA Instructor Tip: 4-Second Rule: Double your following distance behind the lead vehicle. Water film reduces tyre contact patch. Risk of aquaplaning in tyre ruts. Typical Mayo hazard: Breaffy Road (N60) and N84 corridors during frequent Atlantic rain fronts.
Official RSA Speed Limits & Stopping Distance Matrix
Speed Zone
Speed (m/s)
Thinking Dist
Dry Asphalt
Wet Rain
Greasy Slime
Black Ice
30 km/h
8.3 m/s
6 m
11 m
14 m
18 m
41 m
50 km/h
13.9 m/s
10 m
23 m
32 m
43 m
108 m
60 km/h
16.7 m/s
12 m
31 m
43 m
59 m
154 m
80 km/h
22.2 m/s
16 m
50 m
72 m
100 m
268 m
100 km/h
27.8 m/s
19 m
71 m
106 m
150 m
412 m
120 km/h
33.3 m/s
23 m
99 m
149 m
212 m
589 m
Before the examiner starts
Permit, discs, and the car.
If the permit or the car is not in order, the test may not go ahead. Check the current RSA list as well as the one here.
Before the examiner gets in
Ten checks for Castlebar and Ballinrobe
If the permit or the car is not in order, the test may not go ahead. Work through the list, then check the current RSA page before you rely on a date.
0 of 10 checked
Statutory Law
Original permit in date for Category B (car). Not a photocopy, digital image, or expired disc.
Rule: Road Traffic (Licensing of Drivers) Regulations
Statutory Law
First-time Category B permit holders must have held their permit for at least 6 calendar months before test day.
Rule: Section 35 Road Traffic Act — 6-Month Rule
Curriculum Gate
All 12 mandatory EDT modules uploaded by your ADI and signed off in the RSA MyEDT portal.
Rule: RSA Essential Driver Training Syllabus
Statutory Law
Original insurance disc displayed on windscreen and named driver confirmation for the test car.
Rule: March 2026 RSA Insurance Verification Protocol
Roadworthiness
Motor tax and National Car Test (NCT) discs in date and clearly displayed on windscreen.
Rule: Road Traffic (National Car Test) Regulations
Signage
Standard red-on-white L-plates fitted front and rear, upright, clean, and not obstructing driver vision.
Rule: Road Traffic (Signs) Regulations — 15cm x 15cm minimum
Safety Critical
Minimum 1.6mm across central 3/4 breadth of tread. No sidewall bulges, cuts, or exposed cords. Cold pressures verified.
Rule: RSA Vehicle Standard Regulations — Grade 3 Abandonment if illegal
Lighting
Headlights (dipped & main beam), sidelights, indicators, rear tail lamps, brake lamps, and reversing lights fully operational.
Rule: Road Traffic (Lighting of Vehicles) Regulations
Visibility
Front and rear demisters operating cleanly, wiper blades clearing cleanly without smearing, and washer fluid filled.
Rule: RSA Cockpit Technical Demonstration
Examiner Safety
Zero dashboard warning lamps (airbag/ABS/engine), dual controls free of obstruction, clean cabin and clear windows.
Rule: RSA Category B Test Vehicle Protocol
Castlebar 3D & Test Preparation
Questions about the moves.
Key answers regarding RSA Category B driving test manoeuvres, Castlebar test routes departing Breaffy House Hotel, vehicle checks, and dual-control tuition.
What driving manoeuvres are assessed during the RSA practical driving test?+
Under RSA Category B examination standards, candidates are evaluated on: reversing around a corner to the left (maintaining 0.3m–0.5m clearance without touching the kerb), turning about on the road to face the opposite direction (3-point turn within road boundaries), perpendicular and bay parking, and hill starts with zero rollback.
Link to this answer #How does the interactive 3D manoeuvre simulator help Irish driving test candidates?+
The 3D simulator models authentic vehicle kinematics, Ackermann steering angles, real-time sightcones and blind spot cones for right-hand-drive cars, and step-by-step POM (Prepare, Observe, Move) routines before driving on public roads.
Link to this answer #What are the rules for entering and negotiating roundabouts in Ireland?+
Under Irish Road Traffic Regulations and the 12 o'clock rule: for taking the first exit to the left, approach in the left lane and signal left. For taking an exit up to 12 o'clock (straight ahead), approach in the left lane without signalling until passing the exit immediately preceding yours. For taking an exit past 12 o'clock, approach in the right lane signalling right, and signal left after passing the exit preceding yours.
The Castlebar Driving Test Centre is at Breaffy House Hotel on the Breaffy Road (N60) in Castlebar, County Mayo (Eircode: F23 X863). A pre-test lesson can include Moneen roundabout and Station Road. This page does not publish a map of the test.
Link to this answer #Can I hire a dual-control manual car for my test at Castlebar Driving Test Centre?+
Test-car hire is €250, plus one required pre-test lesson charged separately. Jacqueline agrees hire only after she has seen safe driving. The car is a dual-control manual Kia for a test at Castlebar Driving Test Centre (Breaffy House Hotel).
Link to this answer #How do wet weather and greasy road conditions in Mayo affect vehicle stopping distances?+
On wet bitumen, friction drops significantly and braking distances double compared to dry conditions. Irish road safety rules mandate extending the dry 2-second following gap to at least 4 seconds, anticipating earlier deceleration approaching bends and junctions.
A two-hour pre-test lesson is €140. Test-car hire is €250, and only after Jacqueline confirms the driving is safe. Lessons are in Kilmaine, Ballinrobe and Castlebar.
Uses your device’s share options, or copies the canonical website address when sharing is unavailable. The site does not receive anything from this action.
2018–2019
Reviews from Facebook.
Maria Tierney, Laura O’Sullivan, Cait Fhearghail and Sinead Hession wrote these on the school’s Facebook page. Their words stay in the original posts. This school does not add a star score or a pass rate.
Hold the car, look around, then go. Do not roll back into the traffic behind you. Lessons use the hills at Breaffy and on Abbey Street in Ballinrobe.
Telemetry & Vectors
Incline: 12% (6.8°)
Gravity Pull: 1613 N
Engine Torque: 1100 N
Rollback: 0 cm
RSA Examiner Marking
Grade 0 (Clean Pass)
Vehicle safely secured by handbrake. Ready for POM routine.
Road Gradient (%)12%
-15% (Decline)0% (Flat)12% (RSA)25% (Steep)
Accelerator "Set the Gas"1400 RPM ✔ IDEAL
800 (Idle)1,400 (Sweet Spot)2,500 (High)
Clutch Pedal Position55% ★ BITE ZONE
0% (Floor)55% (Biting Point)100% (Up)
Handbrake State
Space Test Move-OffH Handbrake1 - 4 Camera Views↑ / ↓ Clutch Bite← / → Accelerator Gas
📋The Official RSA P-O-M Routine on Gradients
P - Prepare
Handbrake firmly applied. Depress clutch fully. Select 1st gear. Set the gas gently to ~1,400 RPM (steady gentle hum). Bring clutch up smoothly to the biting point. Observe the bonnet rise slightly and the engine note deepen.
💡 Bonnet lift (squat) and engine tone drop confirm torque transfer.
⚠️ Do not release handbrake before feeling the bite; doing so causes rollback.
O - Observe
Complete full 360-degree observation sweep: Interior rear-view mirror, left wing mirror, road ahead, right wing mirror, and look over right shoulder into the blind spot.
💡 Blind spot check is mandatory before handbrake release.
⚠️ Do not look down at the handbrake while observing; keep head up.
M - Move
Release handbrake smoothly while maintaining clutch at bite point. As vehicle begins to move forward without rolling back an inch, progressively feed in accelerator and gently release clutch fully.
💡 Smooth progressive handbrake disengagement with balanced footwork.
⚠️ Never rush clutch release once handbrake is down; hold bite for 2-3 metres.
📍Official County Mayo Test Gradients & Hills
Castlebar Test Centre (Breaffy House & McHale Road)
12% - 14%
Spot: Breaffy Woods Hotel Exit Incline & Railway Station Bridge
Key Challenge: Joining N60 Castlebar bypass from gradient with high-speed oncoming traffic. Requires decisive POM routine.
Jacqueline's tip: Practice the bite hold on the quieter Breaffy service slope before doing test-pace hill starts on the N60 junction.
Ballinrobe Driving Area
10% - 15%
Spot: Abbey Street Incline & Neale Road Crossroads
Key Challenge: Narrow historical street with parked cars on one side. Precise clutch bite and 360° observations mandatory.
Jacqueline's tip: Watch for pedestrian movement from shop doorways along Abbey Street while holding the bite.
Claremorris Driving Routes
11% - 16%
Spot: Church Hill & Old Knock Road Gradients
Key Challenge: Stopping on gradient behind queuing traffic at town lights. Keeping safe 1-car-length buffer from vehicle ahead.
Jacqueline's tip: Tires-and-tarmac rule: Ensure you can see the rear tyres of the car ahead touching the road.