Pre-test preparation from the Castlebar centre at Breaffy House. The aim is a calm drive and a clear read of the fault grades. This page does not promise a test result.
Interactive Pre-Test Candidate HubLaunch the Castlebar 3D Driving Simulator & Candidate Hub
Inspect car secondary controls, test your lane positioning on multi-lane roundabouts, practice stopping physics on wet Mayo tarmac, and audit yourself with our official mock test scorecard.
Four steps. The rules for each one stay on the RSA or NDLS page linked from the card.
01Theory test + learner permit
The RSA route starts with the driver theory test, then a learner permit. Check the current RSA guidance for where a learner-permit holder may drive, who must accompany them, L-plates, and category-specific passenger, trailer, or other conditions.
For most car learner drivers, Essential Driver Training is 12 one-hour sessions with an Approved Driving Instructor. Eligible learners may follow reduced EDT with six sessions; only current, eligible training should be relied on and your record is checked in MyEDT.
Between lessons, practise only within the current learner-permit and supervision rules. For a car learner, that includes the RSA’s restrictions on motorway and unaccompanied driving, the accompanying-driver rules, and L-plates.
Before relying on a test date, check the six-month rule where it applies, your required EDT sessions in MyEDT, your valid permit, and the current vehicle and insurance requirements, including the certificate of motor insurance rule.
The Castlebar test leaves from Breaffy House. Use the checks below before you rely on a date.
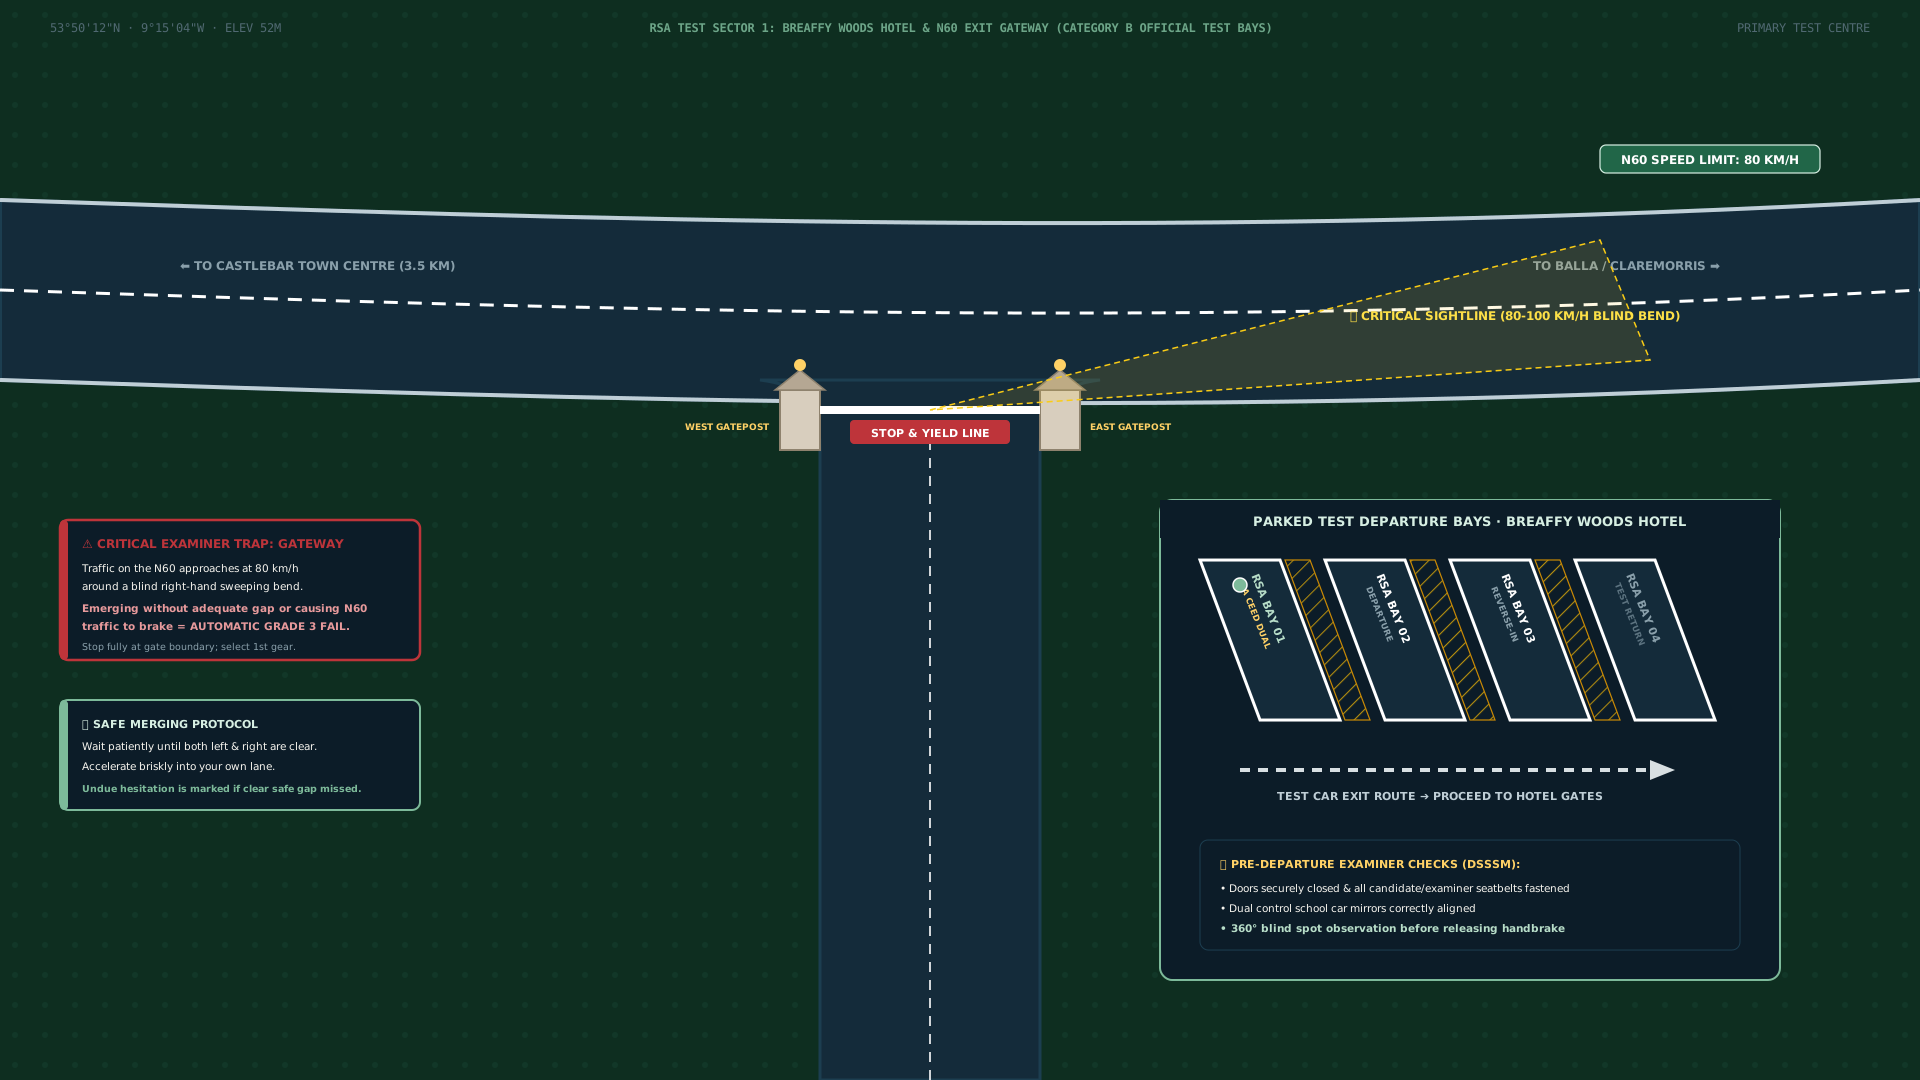
Breaffy House Departure
Test Centre Departure Bays
Location: Breaffy House Hotel & Resort (F23 X863)
Key Hazard: Emergence onto N60 Breaffy Road with 100 km/h to 60 km/h speed zone transitions.
Primary Focus: Full 360° blind-spot observation, proper POM routine, and confident progression without hesitation.
Moneen Roundabout
Multi-Lane Roundabout Discipline
Location: Moneen roundabout connecting N60 / N5 bypass
Key Hazard: Spiral lane markings, early signaling, and correct exit lane selection under live test traffic.
Primary Focus: MSPSL routine, timely mirror checks before exiting, and maintaining lane position without cutting across traffic.
Castlebar Manoeuvres
Hill starts and the other moves
Where: Garryduff and the hills used in lessons.
What: Turn the car around, reverse around a corner, and move off on a hill without rolling back into traffic.
Watch: The clutch bite, a look all round, and a stop if someone is about to cross or a car is moving.
RSA Category B Competency
Official 15-Competency Marking Standards
The practical driving test at Castlebar evaluates candidates across 15 core competencies: rules/checks, position, observation, signals, clearance, speed, progress, vehicle controls, and right of way. Pre-test tuition with Jacqueline Moran focuses on eliminating Grade 2 (serious) faults and avoiding repetitive Grade 1 errors so you arrive at Breaffy House Hotel fully confident and prepared.
Castlebar RSA Test Centre · Breaffy House Resort (F23 X863 · 53.8378° N, -9.2458° W)
The hour before you leave Breaffy
Park so you can drive straight out
T-60 Mins · Warm-Up Drive
1-Hour Pre-Test Calibration
Meet Jacqueline in Castlebar to settle nerves, rehearse clutch bite-point on a gradient, complete one left-corner reverse, and verify L-plates, tax, NCT, and insurance discs.
T-15 Mins · Bay Staging
Reverse Into Breaffy Bay 01–04
Reverse cleanly into the designated RSA candidate parking bay at Breaffy House Hotel (F23 X863) so your car faces outwards for an unobstructed, low-stress forward departure.
T-05 Mins · Waiting Room & Oral
Permit Verification & Theory
Present your physical Category B Learner Permit to the examiner, answer 5–8 oral Rules of the Road & road sign questions, and walk out to the vehicle for bonnet and light checks.
T-00 Mins · Bay Departure
DSSSM, Secondary Controls & POM
Demonstrate demisters, wipers, and hazard lights in the cabin, complete a full 360° blind-spot sweep (POM), indicate if required, and emerge smoothly onto the N60 Breaffy Road.
On this page
Find a topic.
Search for a lesson, a Castlebar road, or a check on the car.
📑
Castlebar Test Hub⏱ 5 min
Castlebar Driving Test Centre Hub (Breaffy House Hotel)
Dedicated Category B dual-control manual tuition and test-car hire departing Castlebar Test Centre (F23 X863). Eliminates stall and rollback anxiety on steep Mayo gradients.
Transparent Tuition Pricing (€70/hr & Pre-Test / Test Hire)
Clear, transparent fees with zero hidden surcharges: standard €70/hr tuition in Castlebar, Ballinrobe, and Kilmaine; pre-test intensive and dual-control test-car hire.
Clutch Bite Point & POM Control for Test Manoeuvres
Harnessing clutch bite point, Prepare-Observe-Move routines for centimetre-precise turnabouts, 3-4 car length corner reversals, and hill starts without rollback.
Open a card and practise the answer. If a card and the Rules of the Road differ, the book is the source.
On this device
0 of 26 marked (0%)
Local private session · Progress stays securely on this device
🔍
Under Bonnet
How do you check the engine oil level and where would you top it up?
Under-the-bonnet checks are assessed at the beginning of the RSA practical test before driving.
↻ Click or space to flip for RSA answer🔄
RSA Standard Answer
Park on a level surface with the engine off and cold. Open the bonnet, locate the oil dipstick, pull it out and wipe it clean with a lint-free cloth. Re-insert it fully, pull it out again and check that the oil level lies between the minimum and maximum markings. If low, top up through the oil filler cap (with oil can symbol) in small amounts using the correct manufacturer-approved grade.
Key Rule: Engine must be cold/settled; vehicle must be parked on flat level ground.
↩ Click or space to return to question👁
Under Bonnet
How do you check the engine coolant level and what safety precautions must you take?
Examiners expect you to point to the correct translucent expansion bottle and cite MIN/MAX markings.
↻ Click or space to flip for RSA answer🔄
RSA Standard Answer
Locate the translucent coolant expansion tank. Visually check that the coolant liquid level sits between the MIN and MAX indicator lines on the side of the reservoir without removing the cap. Never remove the pressurised cap while the engine is hot, as boiling fluid and steam will cause severe scalding.
Key Rule: Visual check only when hot; never open a pressurised hot radiator/coolant reservoir.
↩ Click or space to return to question👁
Under Bonnet
How do you check the brake fluid reservoir level?
Point to the reservoir on the bulkhead; do not confuse with power steering or clutch reservoirs.
↻ Click or space to flip for RSA answer🔄
RSA Standard Answer
Locate the brake fluid reservoir (typically near the brake booster on the driver’s bulkhead). Check the fluid level through the translucent reservoir body to confirm it is between the MIN and MAX lines. If the fluid is near or below MIN, it signals severe pad wear or a hydraulic leak requiring immediate garage inspection before driving.
Key Rule: Hydraulic safety critical component. Fluid must never drop below MIN.
↩ Click or space to return to question👁
Under Bonnet
Where is the windscreen washer reservoir located and how do you top it up?
Often the first item examiners ask candidates to point out under the bonnet.
↻ Click or space to flip for RSA answer🔄
RSA Standard Answer
Locate the reservoir filler neck, marked with a blue or black cap bearing a windscreen wiper/spray water jet symbol. Open the flip cap and fill with clean water mixed with appropriate windscreen washer concentrate/antifreeze to prevent freezing in winter.
Key Rule: Always use proper screenwash additive rather than plain water to dissolve road grime and bugs.
↩ Click or space to return to question👁
Under Bonnet
What is the legal minimum tyre tread depth in Ireland and how do you check it?
Testing with worn tyres below 1.6 mm or with sidewall damage results in test cancellation.
↻ Click or space to flip for RSA answer🔄
RSA Standard Answer
The legal minimum tread depth for passenger cars (Category B) is 1.6 millimetres across the central three-quarters of the tyre tread around the entire circumference. Check using a tyre tread depth gauge or by inspecting the built-in Tread Wear Indicator (TWI) bars located in the longitudinal tread grooves.
Key Rule: 1.6 mm across central 75% around entire circumference. Also check tyre walls for bulges, cuts, or cords.
↩ Click or space to return to question👁
Under Bonnet
How do you check tyre pressures and where do you find the correct PSI/bar ratings?
Check tyre pressures when the tyres are cold using a reliable pressure gauge. Unscrew the valve cap, press the gauge firmly on the valve stem, read the PSI/bar, and adjust as needed before refitting the dust cap. The manufacturer’s correct figures are located on a sticker inside the driver’s door pillar, inside the fuel filler flap, or in the owner’s handbook.
Key Rule: Check tyres cold. Also remember to check the spare wheel and adjust for full vehicle loads.
↩ Click or space to return to question👁
Secondary Controls
How do you operate the windscreen demister controls?
Failure to clear a fogged windscreen promptly during the road drive incurs a Grade 2 fault.
↻ Click or space to flip for RSA answer🔄
RSA Standard Answer
Turn the ventilation distribution dial to the windscreen icon, switch the fan speed to maximum, set temperature to warm/hot, and activate the Air Conditioning (A/C) button. The A/C acts as a dehumidifier to draw moisture out of the cabin air rapidly.
Key Rule: Always activate A/C alongside hot blower air for rapid moisture extraction.
↩ Click or space to return to question👁
Secondary Controls
How do you operate the heated rear window demister?
Examiners verify secondary controls knowledge while seated inside the car prior to driving off.
↻ Click or space to flip for RSA answer🔄
RSA Standard Answer
Press the rectangular heated rear window switch located on the centre console or climate control panel. An amber indicator light illuminates on the button or instrument cluster while the embedded electrical grid heats the glass.
Key Rule: Heated rear window uses a rectangular glass symbol; front windscreen uses a curved trapezoid symbol.
↩ Click or space to return to question👁
Secondary Controls
When should rear fog lights be used and how do you switch them on?
Leaving fog lights illuminated in clear conditions is an offence and causes severe glare.
↻ Click or space to flip for RSA answer🔄
RSA Standard Answer
Operate the rotary switch or button on the lighting stalk/dash marked with the horizontal beam intersected by a wavy vertical line. Rear fog lights must ONLY be used in dense fog or falling snow when visibility is reduced to less than 100 metres, and must be switched off as soon as visibility improves.
Key Rule: Never use in ordinary rain or good conditions as they dazzle trailing drivers and mask brake lights.
↩ Click or space to return to question👁
Secondary Controls
When is it legal and appropriate to use hazard warning lights?
Misuse of hazard warning lights to justify illegal parking is severely penalized.
↻ Click or space to flip for RSA answer🔄
RSA Standard Answer
Activate the red triangular button on the dashboard when your vehicle is temporarily broken down, creating an obstruction, or to warn trailing drivers of sudden severe danger or a traffic queue ahead on a high-speed dual carriageway/motorway.
Key Rule: Never use hazard lights while parking illegally or double-parking.
↩ Click or space to return to question👁
Secondary Controls
How do you test the mechanical parking brake for excessive wear or travel?
Ensures the candidate understands how the mechanical handbrake cable functions.
↻ Click or space to flip for RSA answer🔄
RSA Standard Answer
Apply the footbrake firmly to secure the vehicle. Release the parking brake, then pull the lever upwards counting the clicks until it locks under firm resistance (typically 4 to 7 clicks). The lever should hold firmly without travelling to the top of its ratchet slot, and the vehicle must not roll on an incline.
Key Rule: Secure vehicle with footbrake first before testing parking brake lever ratchet travel.
↩ Click or space to return to question👁
Right of Way
Who has right of way at an uncontrolled crossroads of equal importance?
Failure to give way to traffic from the right at uncontrolled junctions is an automatic Grade 3.
↻ Click or space to flip for RSA answer🔄
RSA Standard Answer
Traffic coming from your right has priority. You must yield to all traffic approaching from your right unless a Garda, traffic light, or regulatory road sign instructs otherwise.
Key Rule: Yield to traffic on your right. Never assume another driver will yield automatically.
↩ Click or space to return to question👁
Right of Way
What is the rule regarding yellow box junctions and what is the one legal exception?
Stopping in a box junction because the straight-ahead exit was blocked is an immediate test fault.
↻ Click or space to flip for RSA answer🔄
RSA Standard Answer
You must NOT enter a yellow box junction unless your exit lane is completely clear so you can drive through without stopping. The ONE exception is when you are turning right: you may enter the box and wait if you are prevented from turning right only by oncoming traffic or right-turning vehicles in front of you.
Key Rule: Enter and wait only to turn right against oncoming traffic when your destination road is clear.
↩ Click or space to return to question👁
Right of Way
What lane and indicator rules apply when taking an exit straight ahead (12 o’clock) on a roundabout?
Signalling left on approach for a straight-ahead exit confuses other road users and is a Grade 2 fault.
↻ Click or space to flip for RSA answer🔄
RSA Standard Answer
Approach in the left lane unless directional road arrows or signs specify otherwise. Do NOT indicate on approach. Maintain your lane position around the circulation. Check your centre and left mirrors, signal left immediately after passing the exit preceding the one you intend to take, and exit smoothly in the left lane.
Key Rule: Left lane on approach; no signal on approach; signal left after passing the exit before yours.
↩ Click or space to return to question👁
Right of Way
What rules apply when taking an exit past 12 o’clock (turning right) on a roundabout?
Crucial for multi-lane roundabouts in Castlebar (e.g., Station Road / Westport Road roundabout).
↻ Click or space to flip for RSA answer🔄
RSA Standard Answer
Signal right on approach and position your vehicle in the right-hand lane. Give way to traffic already circulating from your right. Stay in the inner right lane around the island while keeping your right signal on. As you pass the exit immediately preceding your chosen exit, check mirrors and your left blind spot, switch your signal to left, move smoothly across into the outer lane, and exit.
Key Rule: Right lane + right indicator on approach; switch to left indicator after passing previous exit.
↩ Click or space to return to question👁
Right of Way
When is it legally permissible to overtake on the left in Ireland?
Standard overtaking must always be conducted safely on the right.
↻ Click or space to flip for RSA answer🔄
RSA Standard Answer
You may overtake on the left in three circumstances: (1) When the driver ahead has signalled their intention to turn right and you have room to pass safely on the left; (2) In slow-moving traffic queues where lanes are travelling at different speeds and traffic in the right lane is moving slower; (3) When turning left at a junction with a designated left-turning lane.
Key Rule: Never weave or undertake at high speed on dual carriageways or motorways.
↩ Click or space to return to question👁
Right of Way
What should you do when approached by an emergency vehicle with blue flashing lights?
Panic braking or blocking an intersection when hearing sirens is a common candidate error.
↻ Click or space to flip for RSA answer🔄
RSA Standard Answer
Stay calm, check your mirrors, and observe the emergency vehicle’s direction. Signal and pull over to the left if safe and legal to do so, leaving a clear path. Do not brake harshly, do not stop in the middle of a junction, do not mount the pavement dangerously, and do not pull into a bus lane if prohibited.
Key Rule: Yield calmly without panic or abrupt manoeuvres that endanger pedestrians or cyclists.
↩ Click or space to return to question👁
Road Markings & Limits
What does a single continuous white line down the centre of the road mean and when can you cross it?
Straddling or crossing a continuous white line without lawful exception is a severe Grade 3 fault.
↻ Click or space to flip for RSA answer🔄
RSA Standard Answer
A continuous white line forbids overtaking or straddling. You must drive to the left of the line. You may ONLY cross it if: (1) directed by a Garda or authorised person; (2) to avoid an obstruction or stationary broken-down vehicle when safe; (3) to turn into or out of an adjoining property or entrance.
Key Rule: Never cross to overtake moving vehicles, even if moving slowly, unless safe to pass an obstruction.
↩ Click or space to return to question👁
Road Markings & Limits
What rule applies when a broken white line runs alongside a continuous white line?
Tested frequently on rural Mayo national primary and regional roads.
↻ Click or space to flip for RSA answer🔄
RSA Standard Answer
You must obey the line nearest to your side of the road. If the broken line is on your side, you may cross it to overtake when the road ahead is completely clear. If the continuous white line is on your side, you must not cross or straddle it.
Key Rule: Always obey the marking immediately adjacent to your vehicle.
↩ Click or space to return to question👁
Road Markings & Limits
What do yellow zig-zag road markings indicate outside schools and pedestrian crossings?
Stopping on zig-zag lines is illegal and severely marked during any driving assessment.
↻ Click or space to flip for RSA answer🔄
RSA Standard Answer
Yellow zig-zag markings mean NO stopping, NO parking, and NO waiting at any time, even to pick up or set down passengers. They maintain a clear sightline so drivers can see children and pedestrians and pedestrians can see approaching traffic.
Key Rule: Strict prohibition on stopping at any time. Keeps sightlines clear for school children.
↩ Click or space to return to question👁
Road Markings & Limits
What are the five statutory default speed limits in Ireland (unless signposted otherwise)?
Exceeding a 50 km/h urban speed limit is an instant fail (Grade 3).
↻ Click or space to flip for RSA answer🔄
RSA Standard Answer
The statutory speed limits are: (1) 30 km/h in special slow zones / residential areas; (2) 50 km/h in built-up / urban areas; (3) 80 km/h on non-national rural / regional roads; (4) 100 km/h on national roads (primary and secondary); (5) 120 km/h on motorways.
Key Rule: Speed limits are absolute maximums under ideal conditions, not target speeds for bad weather.
↩ Click or space to return to question👁
Road Markings & Limits
Who is prohibited from using a motorway in Ireland?
A key oral question tested on motorway regulations.
↻ Click or space to flip for RSA answer🔄
RSA Standard Answer
Prohibited users include: Learner permit holders; drivers of vehicles with an engine capacity under 50cc; vehicles incapable of maintaining at least 50 km/h; pedestrians; cyclists; agricultural tractors without approved cabs/tracks; animals; and invalid carriages.
Key Rule: Learners are strictly prohibited from driving on motorways regardless of accompanying driver.
↩ Click or space to return to question👁
Vulnerable Road Users
What is the difference between a Pelican, Toucan, and Zebra crossing?
Proceeding through a flashing amber light while a pedestrian is crossing is a dangerous Grade 3 fault.
↻ Click or space to flip for RSA answer🔄
RSA Standard Answer
A Zebra crossing has black/white road stripes and flashing amber Belisha beacons; drivers must give way once a pedestrian steps onto the crossing. A Pelican crossing is light-controlled with a flashing amber phase where drivers must yield if pedestrians are still on the crossing, but may proceed if clear. A Toucan crossing is light-controlled without flashing amber, designed for both pedestrians AND cyclists to cross together.
Key Rule: Flashing amber on Pelican = yield to pedestrians on the crossing, proceed if crossing is clear.
↩ Click or space to return to question👁
Vulnerable Road Users
What minimum safe overtaking clearance must drivers give cyclists in Ireland?
Overtaking too close to a cyclist is a Grade 3 dangerous fault.
↻ Click or space to flip for RSA answer🔄
RSA Standard Answer
The RSA recommends giving at least 1.0 metre clearance in speed zones of 50 km/h or lower, and at least 1.5 metres clearance in speed zones higher than 50 km/h. If road width or oncoming traffic prevents giving this clearance, you must wait behind the cyclist until safe.
Key Rule: 1.0 metre below 50 km/h; 1.5 metres above 50 km/h. Treat cyclists with the space of a full vehicle.
↩ Click or space to return to question👁
Vulnerable Road Users
What is the legal duty of a driver when a School Warden displays a STOP sign?
Failing to stop or creeping forward while children are on the carriageway is a criminal offence.
↻ Click or space to flip for RSA answer🔄
RSA Standard Answer
You MUST stop before reaching the crossing and remain completely stationary until the warden and all children have safely reached the footway and the warden has lowered the sign and returned to the pavement.
Key Rule: The sign has statutory legal authority equal to a red traffic light.
↩ Click or space to return to question👁
Vulnerable Road Users
How do you apply the two-second rule and four-second rule for following distance?
Tailgating or following too closely is a frequent Grade 2 fault.
↻ Click or space to flip for RSA answer🔄
RSA Standard Answer
In dry conditions, choose a stationary landmark (such as an overhead gantry, sign, or bridge). When the vehicle ahead passes it, count: "Only a fool breaks the two-second rule" (takes 2 seconds). If you reach the landmark before finishing, you are too close. In wet weather or on greasy Mayo roads, double this gap to at least FOUR seconds.
Key Rule: 2 seconds in dry weather; 4 seconds in wet weather; up to 10 seconds on icy surfaces.
↩ Click or space to return to question👁
Castlebar test-day audit
Permit, plates, and the car.
RSA examiner scoring standards, vehicle roadworthiness prerequisites, and test-day presentation rules for candidates attending Castlebar Driving Test Centre (Breaffy House Hotel).
Statutory Documentation
Test-Day Candidate Prerequisites
Original Learner Permit: In-date Category B permit held for at least 6 months (first-time candidates).
Mandatory 12 EDT Modules: Fully logged and signed off on the RSA MyEDT digital portal.
Appointment Confirmation: Presentation at Breaffy House Hotel waiting area 15 minutes before test time.
Signed Declarations: Candidate declaration regarding vehicle roadworthiness and motor insurance coverage.
Vehicle Roadworthiness
Presentation & Inspection Disc Standards
Windscreen Discs: Valid Motor Tax, NCT disc, and valid Motor Insurance disc with matching registration.
Tyre Safety: Minimum 1.6mm tread depth across central 3/4 of tyres with correct cold pressures.
Lighting & Visibility: Full operational check of dipped/main beams, indicators, brake lamps, and washer fluid.
Dual-Control Presentation: Jacqueline's dual-control manual Kia is fully certified and inspected for Castlebar test use.
Examiner Scoring Rubric
RSA Category B Fault Thresholds
Grade 1 (Minor): Minor deviation recorded on scorecard; does not result in test failure.
Grade 2 (Significant): Fail threshold: 9 or more Grade 2s in total, or 4 for same aspect, or 6 under one heading.
Grade 3 (Dangerous): Immediate test failure and potential abandonment for danger or serious traffic breach.
Pre-Test Diagnostic: A 2-hour pre-test lesson (€140) can look at recurring Grade 2 faults. It does not promise they will be gone.
Ask about a pre-test lesson from Breaffy House Hotel.
Practice can include Moneen and the roads around the Castlebar Driving Test Centre. Jacqueline agrees the lesson directly.
Official Irish Rules of the Road hand signals for turning left, turning right, slowing down, and acknowledging Garda traffic pointsmen during the oral and practical examination.
Loading Hand Signals Guide...
Road Safety Authority
What the lessons cover.
Grounded in the preserved 3,909 official RSA documents and Category B guidelines.
Essential Driver Training (EDT)
All 12 mandatory EDT modules taught with structured logbook sign-offs and patient, step-by-step guidance in Mayo.
The Road Safety Authority curriculum structures driver training across four hierarchical tiers. Lifelong driving safety requires progressing from basic mechanical vehicle control up to mature psychological self-evaluation and nervous system regulation.
Tier 1Operational
Vehicle Operational & Physical Control
Mastering the vehicle controls: clutch bite point modulation, progressive braking (zero skid), gear shifts (1st through 6th), pull-push steering (9-and-3 / 10-to-2), and 360° blind spot sweeps before all movements.
EDT Alignment: Modules 1, 2, 3, 4, 7 · Hill start bite control, turnabout, and reverse around corner.
Tier 2Tactical
In traffic
Mirrors, signal, position, speed, then look. On a roundabout, signal for your exit. Leave about 2 seconds in the dry and about 4 seconds in the wet. Leave space for people on foot and on bicycles.
EDT Alignment: Modules 5, 6, 8, 9 · Castlebar Moneen multi-lane roundabouts, Pelican crossings, school zones.
Tier 3Strategic
Journey Context & Strategic Route Planning
Evaluating journey parameters: planning route corridors (N5/N60/R311), adjusting pace for Atlantic weather (standing water, bog fog, twilight glare), preflight vehicle roadworthiness, and time-cushion budgeting.
Look out from the driver's seat of the school Kia, try one situation, and open the bonnet checks when you want them.
Right-hand drive · 6-speed manual
From the driver's seat
You are in the right-hand seat of the school Kia. Jacqueline sits on your left in a lesson. Use Back and Next for the 15 practices, then the large buttons. This is practice on the page. It does not give a test result.
1 of 15Moving off
Speed0GearNeutralHandbrakeOnLimit50
Select first, release the handbrake, and move off when the road is clear.
Move off releases the handbrake and pulls away in first. Stop waits until the car is still, then puts the handbrake on.
ClutchUp
BrakeOff
AcceleratorOff
What to remember
Look all around, including over your right shoulder, before the car moves.
Have a go
Select first, release the handbrake, and move off when the road is clear.
Easy to miss
Missing the shoulder check, or letting the clutch up so the car jumps.
All 15 practicesLook under the bonnet
Pull the release inside the car, then the catch under the front edge, before you look. Say what you can see.
1. Engine oil
With the car level, take the dipstick out, wipe it, put it back fully, then read it. The level belongs between the marks. Top up with the oil named on the filler cap.
2. Brake fluid
The level in the translucent tank belongs between MIN and MAX. Keep the cap sealed.
3. Coolant
Check the tank when the engine is cold. The level belongs between MIN and MAX. Never open a hot cap.
4. Washer fluid
The cap has a windscreen symbol. Top it up with screenwash.
5. Steering
After you start the engine, the steering light should go out and the wheel should turn freely.
6. Battery
The battery is clamped down. The terminals are tight and free of crust.
7. Tyres
You need at least 1.6 mm of tread across the centre three quarters, with no damage on the side. Read the pressures on the sticker in the driver's door, with the tyres cold.
8. Headlights
Switch the dipped headlights on and check both sides.
9. Horn
Press the centre of the wheel. Use the horn only to warn of danger.
10. Demister
Use the front demist, the heated rear window and the air conditioning to clear the glass.
If the picture moves too fast
This only slows the road in the picture. The speed on the dial stays the same.
Official RSA Category B · Technical Pre-Drive Questions
Under-the-Bonnet Vehicle Checks & Interactive Engine Bay
In the RSA driving test, the examiner will ask you to open the bonnet and demonstrate 1 or 2 technical checks. Click any component on the Kia Ceed engine bay below to hear the official question and inspect the procedure:
KIA CEED 1.6 CRDi / 1.0 T-GDi DUAL-CONTROLLED ENGINE COMPARTMENTCLICK COMPONENT TO INSPECT
Engine Oil Dipstick & Filler
Location: Center/front of engine block with bright yellow pull handle.
Inspection Procedure: Vehicle must be on level ground with engine cold or rested for 5 minutes. Pull dipstick, wipe clean with lint-free cloth, re-insert fully, pull out again and observe oil film between MIN and MAX marks.
Official RSA Examiner Question
“Show me how you would check that the engine has sufficient oil before a journey.”
Candidate Model Answer for Full Marks
“I would locate the dipstick, wipe it clean, replace it fully, then check that the oil level is between the minimum and maximum indicator marks. If low, I would add oil via the oil filler cap.”
⚠️Safety Critical: Never overfill beyond the MAX line; use manufacturer-specified viscosity (e.g. 5W-30 synthetic).
RSA Category B Vehicle Preflight · Exterior Roadworthiness Inspection
3D Vehicle Walkaround & Defect Identifier
Before conducting the road drive, the RSA examiner evaluates your vehicle's physical roadworthiness and questions you on tyre safety, lighting, wipers, and statutory discs. Review the 6 key inspection checkpoints mapped on the dual-control Kia Ceed:
RSA Roadworthiness Standard: Minimum 1.6mm tread depth across the central three-quarters of the tyre breadth around the entire circumference. No cuts, tears, or bulges in the sidewall. Cold inflation pressure set to manufacturer specification (Kia Ceed ~32 PSI / 2.2 bar).
Likely RSA Examiner Oral Question
“How would you check that the tyres on this car are in a safe and legal roadworthy condition?”
Recommended Model Answer for Full Marks
“I would use a tread depth gauge or inspect the tread wear indicator bars across the central three-quarters of each tyre to ensure at least 1.6mm of tread remains. I would visually inspect the sidewalls for cuts, cracks, or bulges, and check the cold inflation pressures with a reliable pressure gauge against the vehicle handbook.”
RSA Fault Classification & Defect Rule:
A bald tyre (<1.6mm tread) or visible ply/cord will cause the examiner to immediately cancel or fail the test for presenting an unroadworthy vehicle.
RSA Roadworthiness Standard: Full beam, dipped beam, side lamps, and amber direction indicators must function cleanly without cracked lenses, discolouration, or moisture pooling inside the light cluster.
Likely RSA Examiner Oral Question
“Explain how you would verify that all exterior lighting and indicators are operational before driving.”
Recommended Model Answer for Full Marks
“I would switch on the ignition and activate the dipped headlights and hazard warning lights. I would then walk around the vehicle to check that both front dipped lamps, sidelights, and all six amber indicators (front, side-mirror repeaters, and rear) are illuminating clearly. For brake lights, I would check their reflection in a reflective surface or ask someone to observe while I press the footbrake.”
RSA Fault Classification & Defect Rule:
A blown dipped headlight or inoperative indicator unit constitutes a Grade 2 fault. Driving in low visibility without functioning lights incurs a Grade 3 fault.
RSA Roadworthiness Standard: Clean, unchipped windscreen without cracks exceeding 10mm in driver vision line. Valid Irish Motor Tax, National Car Test (NCT), and Motor Insurance discs displayed clearly on the bottom left of the windscreen.
Likely RSA Examiner Oral Question
“What statutory documents must be displayed on the windscreen before this vehicle can be tested?”
Recommended Model Answer for Full Marks
“Three current discs must be displayed in the windscreen disc holder: a valid Motor Insurance disc showing the vehicle registration and in-date coverage, an in-date Motor Tax disc, and a valid National Car Test (NCT) disc if the vehicle is four years of age or older.”
RSA Fault Classification & Defect Rule:
Missing, expired, or illegible tax, insurance, or NCT discs will result in the driving test being immediately abandoned with forfeiture of the test fee.
4Windscreen Wiper Blades & WashersVisibility Standard
RSA Roadworthiness Standard: Wiper blades must have pliable, undamaged rubber edges capable of clearing rainwater in a single sweep without juddering, streaking, or leaving unswept blind spots. Washer nozzles must be aligned to spray fluid centrally onto the windscreen.
Likely RSA Examiner Oral Question
“How do you inspect the condition of the windscreen wiper blades?”
Recommended Model Answer for Full Marks
“I would gently lift each wiper arm away from the glass and run my finger along the rubber edge to feel for splits, cracks, hardening, or tears. I would ensure the blade is securely clipped to the arm and cleans the glass smoothly when the washer jet is triggered.”
RSA Fault Classification & Defect Rule:
Wipers that smear water or fail to clear the driver's line of vision during precipitation incur a Grade 2 observation fault.
RSA Roadworthiness Standard: Red letter 'L' on a white background, minimum dimensions 15cm x 15cm, displayed upright front and rear where it is clearly visible to other road users without obstructing driver visibility.
Likely RSA Examiner Oral Question
“Where and how must L-plates be fitted to a Category B learner vehicle?”
Recommended Model Answer for Full Marks
“Standard red 'L' plates on a white background (at least 15cm x 15cm) must be firmly fitted in a vertical position on both the front and rear of the vehicle. They must be clearly legible and must not block the driver's line of vision through the windscreen or rear window.”
RSA Fault Classification & Defect Rule:
Arriving for a driving test without properly displayed front and rear L-plates will result in the test being refused.
RSA Roadworthiness Standard: Twin tail lamps, high-level central third brake light, dual reversing lamps, registration plate white illumination lamps, and high-intensity rear fog light (<100m visibility).
Likely RSA Examiner Oral Question
“How would you check that your high-level third brake light and tail lamps are operating correctly?”
Recommended Model Answer for Full Marks
“I would switch on the headlights to check the twin red rear tail lamps. To check the brake lights without an assistant, I would reverse close to a reflective garage door or shopfront window and press the brake pedal, checking the reflection of both outer lamps and the high-level central brake bar in my rear-view mirror.”
RSA Fault Classification & Defect Rule:
Non-functioning brake lights will prevent the test from taking place because trailing vehicles cannot detect deceleration.
Interactive 3D Traffic Navigation
Roundabout lanes and signals.
Explore Irish right-hand drive roundabout navigation across mini-roundabouts, standard multi-lane roundabouts, and spiral junctions (such as Castlebar Station Road). Practice 1st exit, intermediate 12 o'clock exits, and exits past 12 o'clock.
🔄 Roundabout lanes and signals
Practise a roundabout.
Choose a lane, check the mirrors, and signal for the exit. Moneen in Castlebar is the multi-lane example.
INDICATOR
OFF
SPEED
24 km/h
GEAR
2nd Gear
Phase 1 of 4 · 2nd Exit
Approach in Left Lane (No Signal)
Official RSA Procedure
Check interior and left mirrors. Do NOT indicate on approach for straight ahead (12 o’clock). Stay in the left-hand lane unless road arrows specify otherwise.
👀 Mandatory Mirror Checks at this Point:
Interior MirrorLeft Wing Mirror
Examiner Test TrapGrade 2
Signaling on approach for a straight exit is a classic mistake that confuses traffic waiting at the 1st exit.
Grade 2 for giving a misleading signal (e.g. indicating left on approach or indicating right).
Dry and wet
Stopping distances.
The distance while you notice the hazard, plus the distance the brakes need. Wet roads need more room.
How far the car takes to stop
Thinking distance plus braking distance
You travel while you notice the hazard, then again while the brakes work. Wet roads need more room. Leave about two seconds in the dry and about four seconds in the wet.
Thinking Distance
dthink = v · treaction
Assumes 0.7s human perception-reaction
Braking Distance
dbrake = v² / (2 · μ · g)
Quadratic speed increase; g = 9.81 m/s²
Mayo Rule of Thumb
2-Second → 4-Second Gap
Double your distance on wet roads
Interactive Physics Lab
Select Vehicle Speed & Road Surface
Speed: 50 km/h (13.9 m/s)
Select Mayo Road Surface Condition:
Wet Mayo Rain · 50 km/h ResultRisk: Moderate · ~7.4 Car Lengths
Thinking Distance (0.7s)
10 m
Braking Distance (μ=0.45)
22 m
Total Stopping Distance
32 m
0 mThinking: 10 m | Braking: 22 m | Total: 32 m
Local RSA Instructor Tip: 4-Second Rule: Double your following distance behind the lead vehicle. Water film reduces tyre contact patch. Risk of aquaplaning in tyre ruts. Typical Mayo hazard: Breaffy Road (N60) and N84 corridors during frequent Atlantic rain fronts.
Official RSA Speed Limits & Stopping Distance Matrix
Speed Zone
Speed (m/s)
Thinking Dist
Dry Asphalt
Wet Rain
Greasy Slime
Black Ice
30 km/h
8.3 m/s
6 m
11 m
14 m
18 m
41 m
50 km/h
13.9 m/s
10 m
23 m
32 m
43 m
108 m
60 km/h
16.7 m/s
12 m
31 m
43 m
59 m
154 m
80 km/h
22.2 m/s
16 m
50 m
72 m
100 m
268 m
100 km/h
27.8 m/s
19 m
71 m
106 m
150 m
412 m
120 km/h
33.3 m/s
23 m
99 m
149 m
212 m
589 m
When you are asked
The emergency stop.
Calculate thinking distance, mechanical braking distance, and total stopping distance across 30 km/h to 120 km/h under dry, wet, and icy conditions with gear recommendations.
Loading Emergency Braking Studio...
Vision Zero Road Safety Goals
Speed, and people on foot or on a bicycle.
Master Irish statutory speed limits (30 to 120 km/h), overtaking clearance mandates for pedal cyclists (1.0m/1.5m), pedestrian crossing envelopes, and equestrian encounter protocols.
Loading Speed & VRU Safety Guide...
Practical Blueprint Visualizer
The moves, and how they are marked.
Interactive 3D isometric blueprints for Reverse Around the Corner (3-4 car lengths), Turnabout (3-point turn), Bay Parking, and Hill Starts with exact RSA examiner tolerances.
The moves on the test
Look at the move, then the space around the car
Reverse around a corner, turnabout, roundabouts, hill start, bay park, parallel park, and the emergency stop. Castlebar and Ballinrobe roads are in the same set. The picture supports the lesson. It does not replace it.
Bring the vehicle to a prompt and controlled halt from ~45 km/h on tester command, maintaining strict directional stability without skidding or early clutch coasting.
Step 1: Immediate Progressive Footbrake
At the examiner's verbal command 'STOP!', instantly apply firm, progressive pressure to the footbrake. Keep both hands firmly on the wheel at 9-and-3.
Step 2: Maintain Straight Trajectory
Do not stamp violently or pump the pedal. Retain straight-line steering without swerving or locking wheels while the car decelerates rapidly.
Step 3: Timed Clutch Disengagement
Depress the clutch pedal firmly just before the vehicle comes to a complete halt to prevent engine stall. Avoid dipping the clutch early (coasting).
Step 4: Securing & 360° Safety Scan
Apply the handbrake firmly and select neutral. Release foot pedals. Conduct a rigorous 360° safety observation (mirrors and both blind spots) before moving off.
Practice note: Controlled stop
Brake smoothly, avoid locking the wheels, and secure the car before you move off again. This note does not quote a fault grade.
9. Castlebar practice (Station Road and a 30 km/h zone)
Practice sketch
A practice sketch of Station Road, a slower zone on Spencer Street, and giving way at a zebra crossing. It is not a map of the roads an examiner will use.
Step 1: The Mall Departure Gate
Execute POM routine departing Government Buildings. Progressive acceleration to 50 km/h with 360° observations.
Step 2: Station Rd Roundabout
Yield to traffic from right. Apply 12 o'clock rule: left lane approach, indicate left after passing exit 1.
Step 3: Spencer St 30 km/h Zone
Decelerate smoothly before the 30 km/h gateway sign. Scan pedestrian crossings early and yield to foot traffic.
Step 4: Garryduff Reverse & Return
Execute reverse around corner into Garryduff with zero kerb strike. Maintain lane discipline returning to centre.
Practice note: Castlebar
Slow down before a 30 km/h zone, and move when the gap at the roundabout is there. This note does not quote a fault grade.
10. Ballinrobe practice (Neale Road and Abbey Street)
Practice sketch
A practice sketch of slowing for the Neale Road town signs, a tight corner, and a hill start on Abbey Street. It is not a map of the roads an examiner will use.
Step 1: Neale Rd Speed Gate
Engine braking and progressive footbrake down from 80 to 50 km/h well before the town boundary sign.
Step 2: Church St Heritage Corner
Walking pace clutch control around tight blind corners, scanning rear blind spots for pedestrians on narrow footpaths.
Step 3: Abbey Street hill
Find the bite before you release the handbrake. Avoid rolling back. This note does not promise the result.
Step 4: Main St Roundabout & Bay Park
Decisive lane positioning and signals at mini-roundabouts. Smooth outward bay park return to test centre.
RSA Marking: Ballinrobe Route
Slow down before the town speed signs on the Neale Road. On Abbey Street, avoid rolling back. These are practice notes, not a quoted marking scheme.
Loading Hill Start 3D Visualizer...
Loading RSA Statutory Curriculum...
Statutory Road Signs Hub
Road signs to recognise.
Interactive flashcards and revision hub covering Regulatory signs (red circles / blue discs), Warning signs (yellow diamonds), Roadworks signs (orange/yellow rectangles), and Information signs.
🛑 Irish road signs
Open a sign.
Open a card to see what the sign means. If the card and the Rules of the Road differ, the book is the source.
Category:
RUS 027 · regulatory
STOP Sign
Irish: STOP
Octagonal · Red background with white border and lettering
🔄 Click to view RSA Test RuleGrade 3
RUS 026 · regulatory
YIELD Sign
Irish: GÉILL SLÍ
Inverted Triangle · Red border with white background
🔄 Click to view RSA Test RuleGrade 3
RUS 042 · regulatory
Speed Limit 50 km/h
Circular · Red border, white background, black numerals
🔄 Click to view RSA Test RuleGrade 2
RUS 044 · regulatory
Speed Limit 80 km/h
Circular · Red border, white background, black numerals
🔄 Click to view RSA Test RuleGrade 2
RUS 045 · regulatory
Speed Limit 100 km/h
Circular · Red border, white background, black numerals
🔄 Click to view RSA Test RuleGrade 2
RUS 046 · regulatory
Speed Limit 120 km/h
Circular · Red border, white background, black numerals
🔄 Click to view RSA Test RuleGrade 3
RUS 050 · regulatory
No Entry
Circular · Red background with horizontal white bar
🔄 Click to view RSA Test RuleGrade 3
RUS 012 · regulatory
No Right Turn
Circular · Red border with diagonal red bar over right turn arrow
🔄 Click to view RSA Test RuleGrade 2
RUS 011 · regulatory
No Left Turn
Circular · Red border with diagonal red bar over left turn arrow
🔄 Click to view RSA Test RuleGrade 2
RUS 014 · regulatory
No Overtaking
Circular · Red border with red car passing black car
🔄 Click to view RSA Test RuleGrade 3
RUS 013 · regulatory
Clearway
Circular · Blue background with red border and red diagonal X
🔄 Click to view RSA Test RuleGrade 2
RUS 018 · regulatory
Parking Prohibited
Circular · Blue background with red border and single diagonal slash
🔄 Click to view RSA Test RuleGrade 2
W 001 · warning
Crossroads Ahead
Diamond · Amber background with black cross (+)
🔄 Click to view RSA Test RuleGrade 2
W 002 · warning
T-Junction Ahead
Diamond · Amber background with bold black T
🔄 Click to view RSA Test RuleGrade 2
W 040 · warning
Roundabout Ahead
Diamond · Amber background with 3 circular rotating arrows
🔄 Click to view RSA Test RuleGrade 2
W 010 · warning
Sharp Bend to Left
Diamond · Amber background with black sharp left bend chevron
🔄 Click to view RSA Test RuleGrade 2
W 011 · warning
Sharp Bend to Right
Diamond · Amber background with black sharp right bend chevron
🔄 Click to view RSA Test RuleGrade 2
W 060 · warning
Slippery Road Surface Ahead
Diamond · Amber background with car skidding and tyre swerve tracks
🔄 Click to view RSA Test RuleGrade 2
W 070 · warning
Pedestrian Crossing Ahead
Diamond · Amber background with person crossing on zebra stripes
🔄 Click to view RSA Test RuleGrade 3
W 072 · warning
School Ahead / Children Crossing
Diamond · Amber background with adult holding child by the hand running
🔄 Click to view RSA Test RuleGrade 2
W 080 · warning
Traffic Signals Ahead
Diamond · Amber background with vertical traffic light showing Red, Amber, Green
🔄 Click to view RSA Test RuleGrade 2
W 090 · warning
Hump Bridge or Speed Ramp Ahead
Diamond · Amber background with speed cushion profile
🔄 Click to view RSA Test RuleGrade 1
RUS 001 · mandatory
Turn Left Only
Circular · Blue background with white curved arrow pointing left
🔄 Click to view RSA Test RuleGrade 2
RUS 002 · mandatory
Turn Right Only
Circular · Blue background with white curved arrow pointing right
🔄 Click to view RSA Test RuleGrade 2
RUS 005 · mandatory
Keep Left
Circular · Blue background with white diagonal arrow pointing downward to the left
🔄 Click to view RSA Test RuleGrade 3
RUS 049 · mandatory
Mini-Roundabout Ahead
Circular · Blue background with three circular white arrows
🔄 Click to view RSA Test RuleGrade 2
RRM 001 · marking
Continuous White Centre Line
Road Marking · Solid unbroken white line down road centre
🔄 Click to view RSA Test RuleGrade 2
RRM 002 · marking
Double Continuous White Lines
Road Marking · Two parallel solid unbroken white lines down centre
🔄 Click to view RSA Test RuleGrade 3
RRM 020 · marking
Yellow Box Junction
Road Marking · Criss-cross diagonal yellow grid painted in junction
Road Marking · Two parallel yellow lines painted along edge of carriageway
🔄 Click to view RSA Test RuleGrade 2
Practice aid · not a clinical treatment
10-minute breathing pause
A breathing pause from Jacqueline Moran (ADI 34687) that you can try while parked. It is not therapy and it does not promise a test result.
Vagus Reset4 · 7 · 8
Inhale 4s · Hold 7s · Exhale 8s
Synchronize your breath with the visual pulsing orb. Smooth, prolonged exhales stimulate the vagal brake to slow rapid heart rates and unclench steering hand tremor.
4 In-Cockpit Somatic Anchors:0 / 4 Checked
1. Relax Steering Grip (White Knuckle Release)
Gently open both hands flat on top of the steering wheel. Wiggle your fingers, shake your wrists, and hold the wheel at 9-and-3 with light, flexible palm pressure.
2. Shoulder Drop & Lumbar Grounding
Take your shoulders up to your ears for 3 seconds, then drop them completely. Press your lower back and hips firmly into the car seat cushion.
3. 3-Point Car Park Peripheral Scan
Look out through the windscreen and identify 3 stationary objects (a distant tree, a lamp post, a parked car wheel). Re-expands your visual field.
4. Internal SPPAR Reminder
Silently recite: Signs, Positioning, Prioritization, Assessment, Response. 'I do not have to be perfect; I only have to be safe and calm.'
Essential Driver Training
The 12 lessons.
Statutory Category B curriculum covering car control, hazard anticipation, and independent navigation.
Your record
Tick off the 12 lessons
Most learners do all 12, one hour each, with an approved instructor, and the lesson is recorded in MyEDT. Reduced EDT is six lessons, and only after it is approved. Open a lesson for what it covers and what to practise between lessons.
Identification of dashboard warning lamps (ABS, airbag, check engine, battery)
📍 Mayo Test Centre Relevance
Tested at the start of your Category B test before leaving the Castlebar RSA Driving Test Centre at Breaffy House Resort (Breaffy Road, N60, Eircode F23 X863).
🚗 Sponsor Practice Milestone
Practise cockpit drills until adjustments take under 60 seconds.
EDT 2Correct Positioning 1Straight line road positioning, lane discipline, and clearance margins▾
📋 Key Statutory Competencies:
Maintaining central lane discipline between centre line and road verge
Adhering to the 1-metre safe door clearance rule when passing parked vehicles
Lane discipline on Mayo regional routes (N5, N59, N60 approaches)
Continuous mirror observation (interior, exterior left and right) before position adjustments
📍 Mayo Test Centre Relevance
Evaluated along wide two-way roads like Breaffy Road and Station Road in Castlebar.
🚗 Sponsor Practice Milestone
Drive along local straight roads focusing on relaxed hands and stable road centering.
EDT 3Changing Direction 1MSPSL routine for standard left and right turns at T-junctions▾
📋 Key Statutory Competencies:
Mirrors (interior and relevant door mirror) well ahead of turn
Signal timed to inform without misleading other road users
Position: left for left turns; just left of the centre line for right turns
Speed control: 2nd gear deceleration and smooth clutch bite without coasting
Look: final observations before turning, giving way to oncoming traffic and pedestrians
📍 Mayo Test Centre Relevance
Junction turns off Springfield and Newport Road into residential estates.
🚗 Sponsor Practice Milestone
Repeated left and right turns into quiet residential avenues using the full MSPSL sequence.
EDT 4Progression ManagementAppropriate speed, smooth acceleration, and progressive gear selection▾
📋 Key Statutory Competencies:
Progressing up to the statutory speed limit when conditions and visibility permit
Smooth gear changes without rev flare, lurching, or looking down at the gearstick
Progressive braking: gentle initial press, firm middle, and light release before stopping
Maintaining a 2-second gap in dry weather and a 4-second gap in Mayo rain
📍 Mayo Test Centre Relevance
Speed transitions from 50 km/h town zones to 80 km/h and 100 km/h Mayo bypass sections.
🚗 Sponsor Practice Milestone
Practise smooth 2nd → 3rd → 4th upshifts and anticipating braking zones early.
Repeated entries and exits on multi-lane roundabouts from various entry points.
EDT 12Independent Driving & Test ReadinessIndependent navigation, road signage following, and final mock test composure▾
📋 Key Statutory Competencies:
Following multi-destination road signs independently for 10-15 minutes
Composure under test conditions: recovering calmly if a wrong turn is safely taken
Complete mock test audit covering all Category B competencies with Jacqueline Moran
Final review of MyEDT logbook uploads before practical test scheduling
📍 Mayo Test Centre Relevance
Full 35-40 minute practical mock test simulating official Castlebar test routes.
🚗 Sponsor Practice Milestone
Independent 30-minute drives following signs to Westport, Ballinrobe, or Claremorris.
● 12 Hours Mandatory ADI Tuition with Jacqueline Moran● ~36 Hours Supervised Sponsor Practice Recommended● Verified on the official RSA MyEDT Portal
RSA Essential Driver Training · Category B
The 12 lessons, and what each one is for
Most learners do all 12, one hour each, with an approved instructor before they book the test. Reduced EDT is six of them, and only after it is approved. MyEDT is the record of the lessons, not of practice between lessons.
Execute the Cockpit Drill (DSSSM: Doors, Seat, Steering, Seatbelt, Mirrors)
Master primary and secondary vehicle control operations (gears, clutch bite, wipers, demisters)
Sponsor Tip: Have the learner walk around the car before entering, explaining tyre pressure, tread depth (>1.6mm), and NCT/Tax/Insurance disc validity.
Test Rubric: Examiner tests this in the test-centre bay before engine start with 3 oral vehicle check questions.
Module 2
Correct Positioning 1
Maintain safe central lateral lane positioning on straight urban and regional roads
Keep adequate safety margin from parked vehicles (minimum 1 metre / car door width)
Position correctly on the approach to left and right bends without crossing the centre line
Sponsor Tip: Remind the learner to look well ahead to the horizon to maintain natural lane centre rather than watching the bonnet.
Test Rubric: Failure to maintain proper lane positioning accounts for frequent Grade 2 faults on Irish driving tests.
Module 3
Changing Direction
Apply the MSPSL routine (Mirrors, Signal, Position, Speed, Look) on every turn
Distinguish between major-to-minor and minor-to-major turns at T-junctions and crossroads
Control vehicle approach speed using footbrake in a straight line before turning smoothly in 2nd gear
Sponsor Tip: Practice quiet junction turns in housing estates where the learner must check interior and exterior mirrors before signalling.
Test Rubric: Late signalling or turning without prior mirror checks results in immediate Grade 2 observation faults.
Stage 2: Road Positioning & Manoeuvres
Module 4
Progression Management
Move off smoothly without rollback or stalling on level ground and gradients
Select appropriate gears sequentially and skip gears where suitable to maintain engine flexibility
Regulate acceleration and maintain appropriate progress without undue hesitation or rushing
Sponsor Tip: Encourage timely acceleration up to posted speed limits when road and traffic conditions safely permit.
Test Rubric: Over-hesitation at roundabouts or junctions when safe gaps exist is a primary cause of progress test faults.
Module 5
Correct Positioning 2 (Complex Situations)
Negotiate multi-lane roundabouts following RSA lane selection rules (left lane for exit 1 & 2)
Position correctly on one-way streets and multi-lane urban gyratories
Negotiate pinch points, traffic islands, and road works with priority awareness
Sponsor Tip: Drive the Breaffy Road / Moneen Roundabout in Castlebar, emphasizing early lane choice and exit signals.
Test Rubric: Lane discipline on multi-lane roundabout entry and exit is strictly evaluated by RSA testers.
Module 6
Anticipation and Reaction
Apply the SPPAR decision cycle: Scan, Predict, Plan, Act, Review
Identify developing hazards such as pedestrians near crossings, cyclists, and reversing cars
Maintain the '2-second rule' following distance in dry conditions, doubling to 4 seconds in wet weather
Sponsor Tip: Have the learner narrate potential hazards out loud ('commentary driving') for 10 minutes on a familiar route.
Test Rubric: Reaction to hazards and pedestrian crossings (stopping for stepped-on pedestrians) carries Grade 3 failure weight if missed.
Pre-test mental composure and psychological self-regulation
ADI Sign-Off Requirement: Candidate meets RSA Category B driving test standard with 8 or fewer Grade 2 faults and zero Grade 3 faults.
Practice: ~5 hrs with sponsorMyEDT Verified ✔
Test Day Assurance
Before you book the test.
Ten statutory and practical standards every Mayo learner must satisfy before entering the test centre.
Category B fault grades
Where the test is failed
A Category B test is failed by one Grade 3 fault, by 9 or more Grade 2 faults in total, by 4 Grade 2 faults for the same aspect, or by 6 Grade 2 faults under the same heading.
Grade 1: Minor Fault
A minor deviation from ideal driving that does not compromise safety. Up to 20 recorded across the full test.
Grade 2: Serious Fault
A serious flaw that could potentially endanger others or yourself. Max 8 allowed. 4 of same aspect or 9 total is an immediate fail.
Grade 3: Dangerous / Test Fail
An actual dangerous action or physical examiner intervention. 1 single Grade 3 results in immediate test failure.
Castlebar Test Departure Strategy: At Breaffy House Hotel, ensure your vehicle is parked facing outwards in a forward gear. When instructed to move off, execute full 360° observations (blind spots over left and right shoulders) before releasing the handbrake.
Hill Start: Friction point hold on incline without rolling back even 1 centimetre.
Reverse Around Corner: Continuous mirror checks, smooth clutch control, remaining within 0.5 metres of kerb without touching.
1. Six-Month Permit & Age
Valid Irish Category B learner permit held for a minimum of 6 calendar months from date of issue before practical test eligibility.
Statutory Rule: Section 35 Road Traffic Act
2. 12 EDT Logbook Uploads
All 12 Essential Driver Training modules recorded, signed by your ADI, and verified in the RSA MyEDT national portal.
Verified on MyEDT portal
3. Tyre Tread & Pressure
Minimum 1.6mm tread depth across the central three-quarters of the tyre circumference. Zero structural cuts, bulges, or cords visible.
Grade 3 test abandonment if illegal
4. Discs: NCT, Tax & Insurance
Current, valid NCT disc, original Motor Tax disc, and Insurance certificate/disc showing the test car registration clearly displayed on the windscreen.
March 2026 stricter insurance verification
5. Under-Bonnet Fluid Checks
Able to explain and locate: engine oil dipstick & filler, engine coolant header tank, brake fluid reservoir, and windscreen washer fluid bottle.
Grade 1/2 oral technical questions
6. Cockpit Secondary Controls
Confident operation of front and rear demisters, windscreen wipers and washers, hazard warning lights, and front/rear fog lights without looking away from road.
Demonstrated from driver seat
7. Reverse Around Corner
Reversing into a minor road on the left, keeping within 0.3m to 0.5m of the kerb for 3 car lengths with continuous 360° observations and zero kerb strikes.
Grade 3 for kerb strike or swinging wide
8. Turnabout (3-Point Turn)
Smooth turn in the road between kerbs under fine clutch control. 360° visual sweeps (both blind spots) before every movement, stopping without dry steering.
POM routine: Prepare, Observe, Move
9. Roundabout Discipline
Lane selection, signal timing, and mirror checks on multi-lane junctions like Castlebar Moneen Roundabout (N5/N60). Exit mirror check is strictly enforced.
Grade 2 for missing left exit mirror
10. Gradient Moving Off (Hill Start)
Setting biting point, holding vehicle on handbrake, checking right blind spot, and pulling away smoothly with zero backward roll on steep Mayo hills.
Grade 2 for >15cm rollback; Grade 3 if hazard
Local Mayo Test Focus
Castlebar and Ballinrobe roads.
Breaffy House Hotel test gates, Moneen multi-lane roundabout, Station Road railway crossing, and Garryduff manoeuvre spots.
Local-Bar · Mayo Driving Test Centre Guide
Castlebar & Mayo Pre-Test Routes & Junctions
Jacqueline Moran specialises in preparing Mayo candidates for the Castlebar test centre (Breaffy House Resort, Breaffy Road, N60, Eircode F23 X863) and Ballinrobe. Here is an in-depth breakdown of critical local junctions, speed zones, and manoeuvre test spots:
Castlebar RSA Driving Test Centre (Breaffy House Hotel & An Sportlann)
Location: Breaffy Woods Hotel, Breaffy, Castlebar, Co. Mayo (F23 X863) & An Sportlann (Mitchells GAA)
Test Vehicle: Category B manual or automatic dual-control school vehicle (Kia Ceed) or privately registered vehicle with valid NCT, Tax, Insurance disc, and minimum 1.6mm tyre tread.
Key Castlebar Test Junctions & Roundabouts
Moneen Multi-Lane Roundabout (N5 / N60)
📍 Breaffy Road (N60) into Moneen Industrial Estate / N5 Westport bypass
Priority Rule: Yield right-of-way to all traffic approaching from the right. Lane 1 (left) for 1st exit (Town Centre / Station Road) and 2nd exit (N60 Claremorris); Lane 2 (right) for 3rd exit (N5 Dublin/Sligo/Westport).
Examiner Watchpoint: Examiners observe lane discipline on entry and exit. Cutting across lanes without checking your left exterior mirror will trigger an instant Grade 2 observation fault.
Station Road / McHale Road Level Crossing Junction
📍 Station Road adjacent to Castlebar Railway Station
Priority Rule: Observe railway signals and yield at stop line when red lights flash. Yield to through-traffic on McHale Road when turning right.
Examiner Watchpoint: Stopping on yellow hatching or over-running the stop line when gates are descending is a Grade 3 dangerous fault.
The Mall / D'Alton Drive One-Way Heritage Intersection
📍 Castlebar Town Centre, The Mall & Ellison Street
Priority Rule: Strict one-way circulation. Signal left early, keep vehicle tucked in for left turns, yield to pedestrians on marked crossings.
Examiner Watchpoint: Positioning too far right when turning left in a one-way street, or failing to scan between parked delivery vehicles for pedestrians.
Spencer Street / Duke Street Tight Left Turn
📍 Castlebar town centre commercial core
Priority Rule: Yield to oncoming traffic taking right-of-way on Spencer Street. Watch for tight kerb geometry.
Examiner Watchpoint: Clipping or mounting the kerb with rear left wheel due to turning the steering wheel too early.
Lannagh Road / Westport Road Roundabout (N59)
📍 Lannagh Road exit towards Castlebar Swimming Pool and Mayo General Hospital
Priority Rule: Standard roundabout entry rules. Signal left immediately upon passing the exit prior to your intended exit.
Examiner Watchpoint: Failing to cancel the right indicator after circulating, causing misleading signalling to waiting drivers.
Breaffy Road (N60) Test Centre Departure & Arrival Gates
📍 Breaffy Woods Hotel entrance onto N60 primary carriageway
Priority Rule: Stop at the entrance gates, check both directions across 80 km/h traffic, and accelerate smoothly into your lane without causing oncoming traffic to brake.
Examiner Watchpoint: Undue hesitation when a safe gap opens, or pulling out into traffic causing another driver to slow down (immediate Grade 3 failure).
Castlebar Speed Limit Transitions
30 km/h Slow Zone30 km/h
📍 Garryduff, Knockaphunta, and Pontoon Road residential housing estates
Test Rubric: Examiners will immediately mark a Grade 3 fault for exceeding 30 km/h in marked residential slow zones or near primary schools.
50 km/h Built-Up Urban Limit50 km/h
📍 Castlebar Urban Area (Spencer St, Station Rd, McHale Rd, The Mall)
Test Rubric: Failing to progressively accelerate to 45-50 km/h when roads are clear yields Grade 2 progress faults; exceeding 50 km/h fails the test.
80 km/h Regional Rural Road Limit80 km/h
📍 Breaffy Road approaching Breaffy Village and rural access roads (R310, R373)
Test Rubric: Treating 80 km/h as a target rather than a limit on narrow bends or wet Mayo asphalt. Match speed to stopping sight distance.
100 km/h National Primary Route100 km/h
📍 N5 Castlebar Bypass towards Swinford / Westport
Test Rubric: Undue hesitation merging onto national carriageway from slip roads. Use acceleration lane to match traffic speed.
Castlebar Manoeuvre Locations & Gradients
Turnabout (3-Point Turn)
Knockaphunta Park / Aglish Crescent
Instructional Technique: Apply POM routine (Prepare, Observe, Move). Complete 360° observations before each movement. Keep car moving at slow walking pace with clutch bite; zero dry steering.
Reverse Around a Corner to the Left
Garryduff Drive / Elm Park Entrance
Instructional Technique: Align 0.5m from kerb, check blind spots, reverse looking primarily out rear window. Keep 0.3m to 0.5m kerb clearance without touching or mounting the kerb. Pause immediately if pedestrians or cars appear.
Hill Start / Gradient Moving Off
Humbert Way / St. Bridget's Crescent Incline
Instructional Technique: Set gas slightly, bring clutch to firm biting point, release handbrake cleanly. Ensure absolute zero rollback before moving off into traffic stream.
Bay Parking / Perpendicular Parking
Breaffy Woods Hotel Test Return Bay
Instructional Technique: Select reverse, check 360° for returning candidates and examiners, steer smoothly into centre of bay. Finish in neutral with handbrake applied.
Nervous about the Castlebar test?
Jacqueline Moran (ADI 34687) can take the lesson at a calm pace. This driving page does not provide a clinical service. Tír na nÓg Therapy is a separate website.
Step-by-step interactive examination simulator: rehearse critical decisions departing Breaffy House Hotel onto the N60, Moneen multi-lane roundabout lane choices, and Spencer Street 30 km/h braking points.
Loading Mayo Route Hazard Simulator...
RSA Category B Marking Scheme
A practice fault card.
Real-time simulation of the RSA Category B driving test sheet tracking Grade 1 (minor flaw), Grade 2 (serious fault), and Grade 3 (dangerous fault) with instant pass/fail calculation.
RSA Category B Test Assessment Architecture · Official Marking Sheet
Interactive RSA Driving Test Marking Sheet & Pass/Fail Simulator.
Test your knowledge of the official Irish Category B marking scheme. Click the counters below to log Grade 1 (Minor), Grade 2 (Major), and Grade 3 (Dangerous) faults across all 6 RSA competency domains to observe real-time statutory Pass/Fail determinations.
Load Test Scenario:
✅RSA CATEGORY B TEST: PASS
Candidate demonstrated standard of competence. Certificate of Competence issued immediately by the driving tester.
Grade 1
0
Grade 2
0/8
Grade 3
0/0
1. Rules, Checks & Vehicle Controls
EDT Module 1 (Car Controls & Safety Checks)
G1:0
G2 (Max 3):0
G3 (Danger):0
Under-bonnet fluid reservoirs, secondary controls (demisters, hazard lights), and oral Rules of the Road questions.
Grade 2: Inability to explain brake fluid check or incorrect explanation of pedestrian crossing rules.
Grade 3: Operating vehicle with deflated tyre or failure to activate demister when windscreen steams up.
Mayo Test Route Focus: Testers at Castlebar (Breaffy House) frequently ask for the coolant expansion tank and rear demister controls before leaving the car park.
Centring in lane, bends, junction approach positioning, and multi-lane roundabout lane discipline.
Grade 1: Minor drift on an open straight road without oncoming traffic.
Grade 2: Cutting corners when turning right, or drifting into wrong lane on a roundabout approach.
Grade 3: Mounting the kerb or forcing oncoming traffic on narrow rural Mayo roads to take evasive action.
Mayo Test Route Focus: Take extreme care on Castlebar roundabouts (e.g. Moneen N5/N60 junction) to enter and exit in the correct designated lane without straddling dashed lines.
Rear and side mirror checks before signalling, braking, turning, plus blind spot over-the-shoulder checks.
Grade 1: Checking mirror a second after indicating instead of immediately prior.
Grade 2: Failing to check blind spot over right shoulder before moving off from the kerb into traffic.
Grade 3: Pulling out from a junction or side road in front of approaching traffic without looking.
Mayo Test Route Focus: Always complete the physical shoulder blind-spot check before moving away from the curb at the Breaffy House test centre departure gate.
Timely, unambiguous indicator signals, hazard warning flashers, and standard Irish hand signals.
Grade 1: Cancelling an indicator one click after completing a turn.
Grade 2: Signalling too early past an intermediate turn, misleading other road users.
Grade 3: Signalling right while turning left into an oncoming lane.
Mayo Test Route Focus: Give clear, progressive signals; do not signal left too early on town approaches with multiple closely spaced entrances along Spencer Street.
Driving within posted speed limits, adjusting for road conditions, and making timely progress when safe.
Grade 1: Momentarily exceeding limit by 2 km/h on a gentle downhill before engine braking.
Grade 2: Undue hesitation when a roundabout or junction is clearly empty.
Grade 3: Exceeding the legal speed limit in a 30 km/h or 50 km/h built-up area.
Mayo Test Route Focus: Do not crawl at 30 km/h in an open 50 km/h Mayo town zone when the road ahead is clear; testers mark undue hesitation as a Grade 2 fault.
6. Manoeuvres (Reverse Corner, Turnabout & Hill Start)
Structured guidance for parents and accompanying sponsors supporting a learner driver between professional EDT lessons across Mayo roads.
🤝 Official RSA Sponsor & Accompanied Driver Practice Hub
Accompanied Driver Sponsor & Co-Pilot Guide.
The RSA recommends accompanied practice between Essential Driver Training lessons. Check the current official guidance for the hours that apply to you. Jacqueline Moran (ADI 34687) wrote this guide to help parents, partners, and sponsors practise calmly.
Category B driving instruction · RSA register
Calm rules for the passenger seat
Accompanied practice works better when the passenger stays calm. These are practical reminders for a driving lesson, not a clinical treatment.
⏱️
1. The 3-Second Advance Notice Rule
Never say "Turn right here!" at the corner. Always give directions 100 metres in advance: "At the upcoming crossroads, we will be taking the right turn toward Balla." This gives the learner time to complete the full MSPSL mirror-signal-position sequence.
🗣️
2. Low Pitch, Measured Cockpit Voice
Sudden sharp gasps, stamping phantom passenger brakes, or grabbing the roof grab-handle instantly spikes the learner's heart rate. Keep your vocal tone neutral and measured, even when correcting a mistake.
🛡️
3. De-escalating Sudden Panic
If the car stalls at a busy junction and horns beep behind, do NOT shout. Direct the exact physical sequence: "Handbrake on. Clutch down into neutral. Key back and restart. Take your time."
🎯
4. The 3:1 Post-Drive Debrief
When turning the engine off, never unleash a list of 10 faults. Praise THREE things handled well (e.g. smooth gear change, pedestrian yield, good speed) before discussing ONE skill to refine on the next drive.
RSA Category B Curriculum
Topics to revise.
Deep dive into all 16 official Category B driving syllabus topics with verified source evidence from the Road Safety Authority.
Official RSA Category B Curriculum · Interactive Student Hub
Practise the Category B questions.
An interactive, source-backed learning platform for Mayo learner drivers, combining official RSA tester criteria, under-the-bonnet preflight checks, core test manoeuvres, and Jacqueline Moran's calming pre-test protocol.
Category B driving instruction · RSA register
Score: 0 / 12
Question 1 of 12 · Signs
When approaching an octagonal red STOP sign with a solid white stop line, what is the mandatory action?
Ready to book your next lesson or pre-test in Mayo?
Manual dual-control tuition in Castlebar, Ballinrobe, and Kilmaine.
Understanding road markings is vital for practical test success. Driving examiners closely observe how you respect white lines, yellow boxes, and pedestrian areas:
RRM 001
Single Continuous White Line
Divides opposing traffic streams. You must keep to the left and never cross, straddle, or overtake across this line, except to avoid an obstruction or enter/exit a premises.
Examiner Standard: Crossing or straddling a continuous white line without emergency justification results in an immediate Grade 2 or Grade 3 test fault.
RRM 002
Double Continuous White Lines
Absolute prohibition on crossing or straddling from either direction under any circumstances. Frequently installed on blind bends and hill crests on Mayo roads.
Examiner Standard: Crossing double continuous white lines is marked as a Grade 3 dangerous fault resulting in immediate test failure.
RRM 003
Broken White Line (Short Marks, Long Gaps)
Standard centre-of-road line marking on single carriageways. You may cross or overtake when the road ahead is completely clear and safe.
Examiner Standard: Safe overtaking permitted; examiner evaluates observation, MSM routine, and progressive speed without cutting across following vehicle.
RRM 004
Hazard Warning Broken Line (Long Marks, Short Gaps)
Warns of an approaching hazard such as a blind summit, sharp bend, or concealed junction. Do not cross unless you can see that the road ahead is clear.
Examiner Standard: Overtaking on a hazard warning line without clear forward sight distance is assessed as a Grade 2 progress or Grade 3 dangerous fault.
RRM 005
Continuous Line on Driver's Side / Broken Line Opposite
You must obey the line closest to your vehicle. If the continuous line is on your side, you must not cross or overtake; opposing traffic may overtake if clear.
Examiner Standard: Strictly assessed: crossing the continuous line on your side is an immediate Grade 2/3 violation.
RRM 015
Yellow Box Junction (Criss-Cross)
You must not enter a yellow box junction unless your exit lane is completely clear. Exception: you may enter to wait to turn right, provided you do not block oncoming traffic.
Examiner Standard: Entering a yellow box and becoming stranded because the exit lane was blocked constitutes an immediate Grade 2 junction fault.
RRM 014
Zig-Zag Road Markings at Pedestrian Crossings
Painted approaching Zebra and Pelican crossings. Absolute statutory ban on parking, stopping, waiting, or overtaking the lead moving vehicle.
Examiner Standard: Overtaking another vehicle or creeping into a zig-zag zone while a pedestrian is on or approaching the crossing is a Grade 3 instant test failure.
RRM 017
Solid Transverse White STOP Line
Accompanies an octagonal STOP sign. The vehicle must be brought to a complete standstill behind the solid line before inching forward for visibility.
Examiner Standard: Rolling through a STOP line without wheels coming to a complete stop is a Grade 3 failure for failing to obey statutory sign.
RRM 018
Broken Transverse Yield Line (Double Dashes)
Accompanies a YIELD sign or roundabout entry. You must give way to traffic on the priority road or circulating the roundabout, stopping only if required.
Examiner Standard: Failing to yield right-of-way to circulating traffic is a Grade 3 fault; undue stopping when approach is empty yields a Grade 2 progress fault.
RRM 008
Double Yellow Kerb Markings
Prohibits waiting, parking, or unattended stopping at any time, 24 hours a day, 7 days a week.
Examiner Standard: Pulling in on double yellow lines during test manoeuvres or stopping requests is evaluated as an illegal parking fault.
Examination Standards
How a move is marked.
3-tier fault thresholds (Grade 1, 2, 3), Turnabout, Reverse around corner, Bay parking, and 3-step Parallel Parking.
Loading Test Manoeuvres Guide...
Cognitive Hazard Habits
Mirrors, signal, position, speed, look.
Proven systematic mental frameworks that eliminate test-day hesitation and observation faults.
System of Vehicle Control · RSA Marking Standard
MSPSL & SPPAR Driving Decision Cycles
At a junction, roundabout, bend, or hazard, use a repeatable routine. Two practice models are below. They are not the examiner’s script.
The MSPSL Routine (Junction & Hazard Approach)
M - MirrorsSequence Phase 1
Check interior rear-view mirror followed by appropriate exterior wing mirror before signalling or changing speed/position.
Examiner Criteria: Examiner assesses whether mirror check genuinely informs the subsequent manoeuvre before any foot moves to the brake pedal.
Grade 2 Avoidance: Signalling or braking before checking mirrors, resulting in an immediate Grade 2 observation fault.
S - SignalSequence Phase 2
Apply indicator clearly and in good time (approx. 3-4 car lengths in town) to alert following and oncoming road users.
Examiner Criteria: Signal must be unambiguous, timely, and not misleading near intermediate turnings.
Grade 2 Avoidance: Signalling too late or leaving indicator ticking past an unintended entrance.
P - PositionSequence Phase 3
Take correct road position: left-hand lane or left of centre-line for right turns, maintaining clearance from parked cars.
Examiner Criteria: Candidate demonstrates decisive lane positioning without drifting or cutting across junctions.
Grade 2 Avoidance: Swinging out wide before turning left ('swan-necking') or cutting the corner when turning right.
S - SpeedSequence Phase 4
Decelerate smoothly using progressive footbrake in a straight line; select appropriate gear (typically 2nd gear for 90° turns).
Examiner Criteria: Gear change completed and clutch fully engaged before steering into the new road.
Grade 2 Avoidance: Coasting with clutch depressed around the bend, or arriving in too high a gear causing engine shudder.
L - LookSequence Phase 5
Look, Assess, Decide, Act (LADA). Look right, look ahead, look left, and check blind spots before committing to enter.
Examiner Criteria: Candidate gives way to traffic having right-of-way, but takes safe gaps without undue hesitation.
Grade 2 Avoidance: Staring only in one direction or failing to check pedestrian crossings across the target road.
The SPPAR Hazard Awareness Routine (Scan, Predict, Plan, Act, Review)
Active scanning visible through gentle head movement and early identification of rural Mayo hazards.
P - Predict
Anticipate what could unfold: silage tractors emerging from blind gates, cyclists near Greenway crossings, surface water.
Candidate anticipates potential hazards before they develop into acute emergencies.
P - Plan
Formulate escape space, cover the footbrake pedal, and adjust road positioning proactively.
Smooth, planned deceleration and appropriate lane buffering.
A - Act
Execute control inputs smoothly: progressive braking, gentle horn tap if approaching a blind single-track crest.
Composed, proportional control inputs preserving vehicle balance.
R - Review
Check interior mirror once hazard is resolved to assess traffic behaviour behind; resume safe cruising speed.
Complete situational awareness before and after every driving incident.
Community Safety Mission · County Mayo Road Safety Authority
Mayo Road Safety & Vision Zero Instructional Charter
Jacqueline Moran Safe Driving is dedicated to Ireland's Vision Zero strategy: eliminating road fatalities and serious injuries through defensive habit cultivation, emotional regulation, and deep rural road literacy.
🏆 Mayo Vision Zero Instructional Framework — Committed to 0 Fatalities & Serious Injuries on Mayo Roads4 / 4 Core Defensive Standards Active
1. Rural R-Road Defensive Navigation
R330 / R334 / R345 Mayo Corridors
Mayo's regional network contains concealed agricultural entrances, sunken drains, and sudden narrowings. We train learners to read tree lines, hedge dips, and oncoming reflections well before entering blind bends.
✔ 100% Sightline Stop Rule: Always capable of stopping on your own side of the road in the distance seen to be clear.
Active Instructional Commitment
2. Safe Agricultural Machinery Overtaking
Tractor & Silage Hauler Safety
During seasonal farming peaks in South Mayo, slow tractors create long queues. Learners are coached to avoid aggressive tailgating (which destroys forward visibility) and only commit when a 500m+ clear straight appears.
✔ 3-Second Following Gap: Preserves forward sightline and avoids stone chips or blind overtaking.
Active Instructional Commitment
3. 1.5m Vulnerable Road User (VRU) Shield
Cyclists, Pedestrians & Equine Riders
Most rural Mayo roads lack footpaths. We instill an uncompromising habit of giving pedestrians and cyclists at least 1.5m clearance when passing at speed, dropping down a gear and waiting patiently when oncoming traffic blocks passing space.
✔ Zero Squeeze Passing: If you cannot give 1.5m clearance, you do not overtake.
Active Instructional Commitment
4. Atlantic Weather & Livestock Resilience
Atlantic Gale & Surface Water Protocol
From Clew Bay coastal storms to sheep roaming open hill pastures in Achill and Nephin, Mayo driving demands weather humility. We teach threshold braking, progressive steering, and instant demister operation.
✔ 4-Second Wet Gap: Doubling stopping separation on wet or gritted winter Mayo asphalt.
Active Instructional Commitment
On the page
Practise here first.
Use a tool, then do the same thing in the car. Nothing here promises a test result.
Loading interactive 3D driving simulator...
Castlebar, from Breaffy House · Castlebar Test-Centre Spatial Telemetry Blueprint
Breaffy House, then the N60, Moneen, and Station Road
53.8378° N, 9.2458° W · 3D Route Vectors
Stopping Distance Calculator
Explore thinking and braking distances across 30 to 120 km/h in dry versus wet Mayo conditions, with car length equivalencies and the 2-second / 4-second rule.
Real-time simulation of the RSA Category B marking scheme tracking Grade 1 minor, Grade 2 major, and Grade 3 dangerous faults with instant pass/fail evaluation.
Simulate official test departures from The Mall (Station Rd roundabout & 30 km/h Spencer St) and Neale Rd (speed gate & Abbey St incline) in interactive 3D.
Approved Category B manual driving lessons, intensive 2-hour pre-test preparation, and dual-control test-car hire targeting the Castlebar Driving Test Centre at Breaffy House Hotel.
Statutory Syllabus
EDT lessons, one hour at a time
Twelve EDT modules are twelve lessons at €70 an hour. This website does not sell them as a package. Ask Jacqueline how a completed session is recorded.
Essential answers for learner drivers preparing for their Category B practical driving test at Breaffy House Hotel, Castlebar.
Where is the Castlebar Driving Test Centre located?+
The Castlebar Driving Test Centre is located at Breaffy House Hotel & Resort on the Breaffy Road (N60) in Castlebar, County Mayo (Eircode: F23 X863), with test departure bays situated in the front parking grounds.
A pre-test lesson can leave Breaffy House Hotel onto the N60 and include Moneen roundabout and Station Road. These are practice notes, not a published map of the test.
Test-car hire is €250, plus one required pre-test lesson charged separately. Jacqueline agrees hire only after she has seen safe driving. The car is a dual-control manual Kia for a test at Castlebar Driving Test Centre (Breaffy House Hotel).
Lessons are €70 an hour in Kilmaine, Ballinrobe and Castlebar. Two hours are €140. Jacqueline agrees the lesson directly. No pass is promised.
Link to this answer #What are common fail reasons at the Castlebar driving test centre?+
Frequent faults at Castlebar Driving Test Centre include insufficient observation entering Moneen roundabout or emerging from Breaffy House onto the N60, cutting corners when turning right in residential areas, inadequate progress on national road sections, and rollback during hill starts on Mayo gradients.
The legal minimum tyre tread depth for passenger cars (Category B) in Ireland is 1.6 millimetres across the central three-quarters of the tyre tread around the entire circumference.
Link to this answer #What is the rule for yellow box junctions in Ireland and what is the exception?+
You must not enter a yellow box junction unless your exit lane is completely clear. The one legal exception is when turning right: you may enter and wait if prevented from turning right only by oncoming traffic.
Link to this answer #How do you signal and position for a straight-ahead exit (12 o'clock) at an Irish roundabout?+
Approach in the left lane unless signs or road arrows indicate otherwise. Do not signal on approach. Check mirrors and signal left immediately after passing the exit preceding the one you intend to take.
Default speed limits in Ireland are 30 km/h in special residential slow zones, 50 km/h in built-up urban areas, 80 km/h on non-national rural/regional roads, 100 km/h on national roads, and 120 km/h on motorways.
No. Learner permit holders are strictly prohibited from driving on motorways in Ireland under all circumstances, even when accompanied by an Approved Driving Instructor.
Link to this answer #What is the safe following distance rule for dry vs wet weather?+
Drivers should apply the two-second rule in dry conditions by choosing a fixed roadside landmark. In wet weather or greasy road conditions, double this gap to at least four seconds.
Uses your device’s share options, or copies the canonical website address when sharing is unavailable. The site does not receive anything from this action.
2018–2019
Reviews from Facebook.
Maria Tierney, Laura O’Sullivan, Cait Fhearghail and Sinead Hession wrote these on the school’s Facebook page. Their words stay in the original posts. This school does not add a star score or a pass rate.
A Grade 1 on its own does not fail the test. One Grade 3 does. So do 9 or more Grade 2 faults in total, 4 or more for the same aspect, or 6 or more under the same heading.
Grade 1 · 0% to 35% Severity
Minor infringement: Noted by tester for debrief, but not marked on the tablet/report sheet.
Grade 2 · 36% to 75% Severity
Serious fault: Marked on tablet. Fail triggers: 4 of same aspect, 6 in same category, or 9 overall.
Grade 3 · 76% to 100% Severity
Dangerous fault: Total disregard of traffic controls or danger caused. 1 single Grade 3 = Instant Fail.
Select Aspect (20 shown)
Aspect #2 · Road Position
Position on the Straight, Bends & Lanes
RSA Manual Ref: Section 2
Maintaining proper lateral road positioning: approximately midway between the central dividing line and the left-hand kerb (approx. 1m from kerb).
Grade 1 Severity (0% – 35% Severity · Not Marked)
Slight infringement of position on the straight, slight weaving, or driving slightly too close to left kerb or centre line without risk.
Dangerous or potentially dangerous road position; driving on wrong side of road against oncoming traffic; dangerous lane straddling forcing evasive action.
Official Tester Directive:
Where an applicant unnecessarily crosses a continuous white line, record under 'Road Markings' only, not 'Position'. Driving on hard shoulder to let faster traffic overtake is permitted and NOT a fault.
Common Candidate Pitfall:
Weaving between parked cars separated by more than 2-3 car lengths instead of holding a straight, predictable lateral line.
Mayo Testing Rehearsal: On rural Mayo roads without road markings (e.g. out towards Breaffy or Turlough), keep 1 metre from grass verges without straddling the centre line.
Ready for a full pre-test simulation in Castlebar?
Jacqueline Moran delivers comprehensive mock tests marked strictly against the official RSA 20-aspect tablet sheet.
The examiner can ask about these before the drive. Open a check and practise the answer. If the car or the permit is not in order, the test may not go ahead.
Interactive RSA Simulation
The Official €1 Coin Tyre Tread Test
Drag the slider to simulate tyre wear. If the outer gold band of the €1 coin is exposed above the tread, the tyre has less than 3mm of tread and the RSA advises replacement immediately.
Tyres are the only contact point between the car and the road. Check inflation pressure, minimum legal tread depth (1.6mm), and sidewall integrity.
Official RSA Inspection Protocol:
1. Inflation Pressure: Find manufacturer-specified PSI/Bar on driver door pillar sticker, fuel filler flap, or owner manual. Check when tyres are cold using an accurate pressure gauge.
2. Tread Depth: Minimum legal depth is 1.6mm across central 3/4 breadth around entire circumference. RSA strongly recommends replacing tyres at 3.0mm.
3. The €1 Coin Test: Place a €1 coin into the central tread groove. If the outer gold band is visible, your tyre is worn below 3mm and should be replaced.
4. Sidewall Condition: Inspect for bulges, tears, cuts, exposed cords, or embedded nails.
Safety Precaution:
Under-inflated tyres increase braking distance by up to 20% on wet Mayo roads and dramatically increase hydroplaning risk.
Test-Day Examiner Question
"Show me how you would check that the tyres on this vehicle have adequate tread depth and are safe for the road."
Student Model Answer:
"I would visually inspect all four tyres and the spare. I check that there are no cuts, bulges, or tears on the sidewalls. Using a tread depth gauge or €1 coin, I ensure the tread is at least 1.6 millimetres across the central three-quarters of the breadth of the tyre all the way around, though the RSA recommends 3 millimetres. I would also check tyre pressure against the manufacturer placard on the driver door pillar when the tyres are cold."
Castlebar Test Center Context: Examiners at Castlebar inspect tyre tread and sidewalls before getting in the car. A defective or bald tyre will result in the test being aborted on the spot!
Practise the under-bonnet and vehicle checks with Jacqueline
Every EDT student learns to open the bonnet, point to each reservoir, and demonstrate controls in the test car.
In the Category B driving test, your driver tester may ask you to explain and physically demonstrate the official Irish hand signals used if indicators fail or when responding to An Garda Síochána.
Signal #HS001
Target: Traffic behind and oncoming traffic
Signals to Following & Oncoming TrafficCategory B Standard
I intend to move out or turn right
Physical Gesture Instructions:
Extend your right arm horizontally out of the driver's window, palm facing forward, fingers extended.
Official RSA Test Context:
Used to signal an intention to turn right, overtake, or pull out from the kerb into traffic if indicators are obscured or inoperable.
💡 Jacqueline Moran ADI Pro-Tip:
Ensure your window is opened beforehand if conducting practical hand signals during a demonstration. Never take your eyes completely off oncoming traffic or allow the car to deviate from its lane while signaling.
When you are asked to stop
The emergency stop
Brake firmly, keep the car straight, and look around before you move off again.
Safe speed selection and sharing the road with cyclists, pedestrians, and rural agricultural traffic form core competencies evaluated on your Category B driving test.
✅ PASS: Compliant with Irish Statutory Minimum (1.5m+)
On roads with speed limits over 50 km/h, crossing the centre line into the opposing lane (when safe) is expected to give cyclists 1.5m+.
Hill starts
Move off on a hill.
Hold the car, look around, then go. Do not roll back into the traffic behind you. Lessons use the hills at Breaffy and on Abbey Street in Ballinrobe.
Telemetry & Vectors
Incline: 12% (6.8°)
Gravity Pull: 1613 N
Engine Torque: 1100 N
Rollback: 0 cm
RSA Examiner Marking
Grade 0 (Clean Pass)
Vehicle safely secured by handbrake. Ready for POM routine.
Road Gradient (%)12%
-15% (Decline)0% (Flat)12% (RSA)25% (Steep)
Accelerator "Set the Gas"1400 RPM ✔ IDEAL
800 (Idle)1,400 (Sweet Spot)2,500 (High)
Clutch Pedal Position55% ★ BITE ZONE
0% (Floor)55% (Biting Point)100% (Up)
Handbrake State
Space Test Move-OffH Handbrake1 - 4 Camera Views↑ / ↓ Clutch Bite← / → Accelerator Gas
📋The Official RSA P-O-M Routine on Gradients
P - Prepare
Handbrake firmly applied. Depress clutch fully. Select 1st gear. Set the gas gently to ~1,400 RPM (steady gentle hum). Bring clutch up smoothly to the biting point. Observe the bonnet rise slightly and the engine note deepen.
💡 Bonnet lift (squat) and engine tone drop confirm torque transfer.
⚠️ Do not release handbrake before feeling the bite; doing so causes rollback.
O - Observe
Complete full 360-degree observation sweep: Interior rear-view mirror, left wing mirror, road ahead, right wing mirror, and look over right shoulder into the blind spot.
💡 Blind spot check is mandatory before handbrake release.
⚠️ Do not look down at the handbrake while observing; keep head up.
M - Move
Release handbrake smoothly while maintaining clutch at bite point. As vehicle begins to move forward without rolling back an inch, progressively feed in accelerator and gently release clutch fully.
💡 Smooth progressive handbrake disengagement with balanced footwork.
⚠️ Never rush clutch release once handbrake is down; hold bite for 2-3 metres.
📍Official County Mayo Test Gradients & Hills
Castlebar Test Centre (Breaffy House & McHale Road)
12% - 14%
Spot: Breaffy Woods Hotel Exit Incline & Railway Station Bridge
Key Challenge: Joining N60 Castlebar bypass from gradient with high-speed oncoming traffic. Requires decisive POM routine.
Jacqueline's tip: Practice the bite hold on the quieter Breaffy service slope before doing test-pace hill starts on the N60 junction.
Ballinrobe Driving Area
10% - 15%
Spot: Abbey Street Incline & Neale Road Crossroads
Key Challenge: Narrow historical street with parked cars on one side. Precise clutch bite and 360° observations mandatory.
Jacqueline's tip: Watch for pedestrian movement from shop doorways along Abbey Street while holding the bite.
Claremorris Driving Routes
11% - 16%
Spot: Church Hill & Old Knock Road Gradients
Key Challenge: Stopping on gradient behind queuing traffic at town lights. Keeping safe 1-car-length buffer from vehicle ahead.
Jacqueline's tip: Tires-and-tarmac rule: Ensure you can see the rear tyres of the car ahead touching the road.
Lessons, checks, and grades
The 12 lessons, the checks, and the grades.
Open a tab for the 12 lessons, the checks before the test, or how faults are marked. The RSA pages linked from this site stay the source. This is not the full RSA archive.
Category AMAge 16+ · Group 1
Mopeds and light quadricycles
Mopeds/light quadricycles
MAM: Not stated
Training: IBT/motorcycle route; confirm current category guidance
Category A1Age 16+ · Group 1
Motorcycles up to 125 cc / 11 kW; tricycles up to 15 kW
Two-wheel motorcycles within 125 cc, 11 kW and 0.1 kW/kg; tricycles up to 15 kW
MAM: 125 cc/11 kW/0.1 kW/kg; tricycle 15 kW
Training: IBT; confirm current certificate/category status
Category A2Age 18+ · Group 1
Motorcycles up to 35 kW and 0.2 kW/kg
Motorcycle up to 35 kW, 0.2 kW/kg and not derived from more than double its power
MAM: 35 kW and 0.2 kW/kg
Training: IBT and progressive-access rules; confirm current guidance
Category AAge 24, or 20 with progressive access; 21 for tricycles+ · Group 1
Category B vehicle with trailer up to 3,500 kg MAM
Category B drawing vehicle and trailer
MAM: Drawing vehicle within B limits
Training: No EDT/IBT claim; confirm current combination rules
Category WAge 16+ · Group 1
Work vehicles and land tractors
NDLS work-vehicle/design-speed and land-tractor definitions
MAM: Defined by construction/use rather than one MAM in summary
Training: No EDT/IBT/CPC claim; confirm W route
Category C1Age 18+ · Group 2
Goods vehicles over 3,500 kg and up to 7,500 kg MAM
Up to 7,500 kg; up to 8 passengers in addition to driver
MAM: MAM up to 7,500 kg
Training: CPC where professional rules require
Category CAge 21, or 18 with CPC+ · Group 2
Goods vehicles over 3,500 kg MAM
Over 3,500 kg; up to 8 passengers in addition to driver
MAM: MAM over 3,500 kg
Training: CPC where professional rules require
Category C1EAge 18+ · Group 2
C1 combination up to 12,000 kg; specified B combination up to 12,000 kg
C1 with trailer over 750 kg or specified B combination
MAM: C1 or specified B drawing vehicle within the stated combined limit
Training: CPC where professional rules require
Category CEAge 21, or 18 with CPC+ · Group 2
Category C combination with trailer over 750 kg
Category C drawing vehicle with trailer
MAM: Category C drawing vehicle
Training: CPC where professional rules require
Category D1Age 21+ · Group 2
Minibus up to 16 passenger seats and 8 m length
Up to 16 passengers in addition to driver; max 8 m
MAM: D1 vehicle up to 8 m length
Training: CPC where professional rules require
Category DAge 24, or 21 with CPC+ · Group 2
Buses with more than 8 passenger seats
More than 8 passengers in addition to driver
MAM: Bus with more than 8 passenger seats
Training: CPC where professional rules require
Category D1EAge 21+ · Group 2
D1 combination with trailer over 750 kg
Category D1 drawing vehicle with trailer
MAM: Category D1 drawing vehicle
Training: CPC where professional rules require
Category DEAge 24, or 21 with CPC+ · Group 2
D combination with trailer over 750 kg
Category D drawing vehicle with trailer
MAM: Category D drawing vehicle
Training: CPC where professional rules require
Castlebar and Ballinrobe junctions
One junction. One routine.
Open a junction on the Castlebar or Ballinrobe circuit and read the mirrors, signal, position, speed, and look for that turn.
Castlebar: Breaffy House Hotel Departure to Moneen Roundabout
Navigate the transition from the private Breaffy House driveway onto the busy N60 national primary road, leading to the multi-lane Moneen roundabout.
1. Breaffy House Hotel Exit Gate onto N60
Type: Private exit merging onto National Primary (N60) · Speed: 100 km/h on N60 (caution on driveway approach)
You are turning left out of Breaffy House Hotel onto the N60 toward Castlebar. Fast-moving traffic approaches from the right around a gentle bend.
Show the marking ▾
Option A [Grade 3 (Dangerous / Test Fail)]: Breaching the entrance boundary without a full stop forces oncoming N60 traffic to brake, incurring an immediate dangerous fault.
Option B [Clean (Pass)]: Full stop, thorough 360° observations, and positive acceleration matching traffic flow satisfies RSA MSPSL standards.
Option C [Grade 2 (Serious Fault)]: Excessive delay when a safe 100m+ gap was available records an unnecessary hesitation fault.
Examiner Benchmark: At Breaffy House, examiners look for crisp observation and decisive entry into the traffic stream without causing oncoming vehicles to slow down.
2. N60 Moneen Multi-Lane Roundabout
Type: Major Multi-Lane Roundabout (Connecting N5, N60, Town Centre) · Speed: 50 km/h approach
Examiner instructs: 'At the roundabout, take the 3rd exit toward Sligo (N5)'. Heavy traffic is circling the roundabout from the right.
Show the marking ▾
Option A [Grade 3 (Dangerous / Test Fail)]: Incorrect approach lane, incorrect signals, and cutting across lanes creates extreme collision risk.
Option B [Clean (Pass)]: Flawless lane discipline, correct indicator progression, and vital left-mirror shoulder check before exiting.
Option C [Grade 2 (Serious Fault)]: Failing to signal left after passing the preceding exit deprives following drivers of notice.
Examiner Benchmark: Moneen Roundabout is Castlebar's most frequent fault location. The left mirror check before exiting is strictly graded.
3. Spencer Street Urban Zone & Pedestrian Crossing
Type: Narrow Town Centre Street with On-Street Parking · Speed: 30 km/h Special Speed Zone
Approaching a zebra crossing on Spencer Street with pedestrians waiting on the footpath; parked delivery vans restrict door clearance.
Show the marking ▾
Option A [Grade 2 (Serious Fault)]: Exceeding the 30 km/h speed limit and passing pedestrians waiting at a crossing is a serious fault.
Option B [Clean (Pass)]: Perfect speed adaptation, adequate clearance, and courtesy yielding for vulnerable road users.
Option C [Grade 2 (Serious Fault)]: Encroaching on the pedestrian crossing and waving pedestrians across (which RSA warns against) creates safety confusion.
Examiner Benchmark: Castlebar town centre has a strict 30 km/h limit. Never wave pedestrians across; simply stop safely and let them decide.
4. Station Road Railway Level Crossing
Type: Level Railway Crossing with Automated Half-Barriers · Speed: 50 km/h
You approach the railway tracks on Station Road. Traffic ahead is moving slowly and tailbacks are forming on the other side of the tracks.
Show the marking ▾
Option A [Grade 3 (Dangerous / Test Fail)]: Stopping on a railway level crossing is an immediate, automatic test failure and extreme safety breach.
Option B [Clean (Pass)]: Never enter a level crossing unless your entire exit is clear. Impeccable defensive driving.
Option C [Grade 2 (Serious Fault)]: Improper use of horn and aggressive driving.
Examiner Benchmark: Always confirm that your car's back bumper will clear the yellow box / tracks before committing to move forward.
5. Pontoon Road Incline / Hill Start
Type: Steep Residential Gradient · Speed: 50 km/h
The examiner requests: 'Pull in safely on the left gradient'. After stopping, the examiner says: 'When you are ready, move off smoothly up the hill'.
Show the marking ▾
Option A [Grade 2 (Serious Fault)]: Excessive roll-back on a gradient shows lack of vehicle control.
Option B [Clean (Pass)]: Textbook POM routine: Prepare, Observe (including blind spot), Move with fine clutch coordination.
Option C [Grade 2 (Serious Fault)]: Missing the over-the-shoulder blind spot check immediately prior to moving off into traffic.
Examiner Benchmark: Rollback is strictly penalized. Keep feet steady on clutch and gas until the handbrake is fully down and the car is moving forward.
Ballinrobe: Neale Road Departure to Abbey Street Circuit
Experience the unique challenges of South Mayo driving: narrow town streets, restricted sightline T-junctions, and the High Street reverse around corner.
1. Neale Road Test Departure & Speed Limit Gate
Type: Town approach (R334 / Neale Rd) · Speed: 50 km/h gateway entering from 80 km/h
Moving off from the Neale Road test area entering Ballinrobe town. Road narrows with stone walls on either side and school traffic.
Show the marking ▾
Option A [Grade 3 (Dangerous / Test Fail)]: Speeding in a 50 km/h zone and dangerous overtaking on a town approach.
Option B [Clean (Pass)]: Calm, controlled progression with excellent lateral positioning on narrow Mayo roads.
Option C [Grade 2 (Serious Fault)]: Unwarranted slow driving without hazard justification records a lack of progress fault.
Examiner Benchmark: Ballinrobe has historic stone walls. Examiners watch your road positioning—don't hug the left ditch too tightly.
2. Main Street Tight T-Junction with Restricted Visibility
Type: Urban T-Junction with A-Pillar Blind Spots · Speed: 50 km/h
Turning right onto Main Street from a narrow side approach. Old buildings on corners block sightlines until vehicle nose is near the road edge.
Show the marking ▾
Option A [Grade 3 (Dangerous / Test Fail)]: Pulling into the priority road blindly is a Grade 3 dangerous fault.
Option B [Clean (Pass)]: Exemplary creeping and peeping observation technique on restricted Mayo rural town junctions.
Option C [Grade 1 (Minor)]: Hesitation when safe opportunities exist.
Examiner Benchmark: Use the 'peep and creep' technique. Lean forward slightly in the seat to see around the windscreen pillar.
3. High Street Reverse Around Left Corner
Type: Residential Side Road Junction on Left · Speed: 50 km/h (Manoeuvre conducted at walking pace)
Examiner instructs: 'Drive past that opening on the left and stop. I want you to reverse around that corner into the road, keeping close to the kerb.'
Show the marking ▾
Option A [Grade 2 (Serious Fault)]: Relying exclusively on mirrors without physical 360° observations is a serious observation failure.
Option B [Clean (Pass)]: Flawless RSA reverse manoeuvre: walking pace, continuous head movement, zero kerb touching, and yielding priority.
Option C [Grade 3 (Dangerous / Test Fail)]: Mounting the kerb is an immediate Grade 3 test failure.
Examiner Benchmark: If any pedestrian or car enters the street while reversing, STOP immediately and wait. You have no right of way while reversing.
RSA Marking Guidelines · Category B
How a move is marked
One Grade 3 fails the test. So do 9 or more Grade 2 faults in total, 4 for the same aspect, or 6 under the same heading. A Grade 1 on its own does not.
The 3-Tier RSA Fault Grading System
Grade 1 (Minor Fault)
A minor deviation from ideal driving technique that does not compromise road safety or inconvenience other road users.
Threshold: No specific numerical limit; however, numerous Grade 1 faults reflect an inconsistent driving standard and will invite closer examiner scrutiny.
Grade 2 (Serious Fault)
A significant error that could potentially affect the safety or convenience of other road users, pedestrians, or vehicle occupants.
Threshold: FAIL CONDITIONS: 4 or more Grade 2 faults for the same driving aspect; OR 6 or more Grade 2 faults under the same heading; OR 9 or more Grade 2 faults in total across the entire test.
Grade 3 (Dangerous Fault)
An action or omission that causes actual danger or potential imminent danger to any road user, or requires examiner intervention.
Threshold: FAIL CONDITIONS: Exactly 1 Grade 3 fault results in an immediate test failure and premature test conclusion.
Mandatory Practical Manoeuvres
Turnabout in the Road (3-Point Turn)
Technique: Position car on the left, apply handbrake, select 1st gear. Complete 360° observation sweep (both blind spots). Move off slowly using clutch bite while turning steering wheel briskly towards right kerb. Stop 0.5m before right kerb with handbrake, select reverse, re-check 360°, steer left across to opposite kerb. Select 1st gear, final 360° check, and drive away smoothly in new direction.
Common Pitfalls: Touching or striking the kerb; failing to check blind spots before reversing; dry steering while stationary; rushing clutch release causing a stall.
Marking Severity: 1 Grade 3 (mounting kerb/danger) or Grade 2 for observation omission.
Reverse Around a Corner to the Left
Technique: Drive past corner, position parallel approximately 0.5m from kerb and 2-3 car lengths ahead. Select reverse gear, complete 360° observation sweep. Reverse slowly looking primarily through rear window with glances at left mirror. Guide vehicle around kerb contour maintaining 0.3m to 0.5m consistent margin. Continue straight for 3 car lengths in minor road.
Common Pitfalls: Swinging vehicle front out across oncoming traffic; mounting or scrubbing the kerb; failing to pause when vehicles or pedestrians approach from any angle.
Marking Severity: Grade 3 for mounting kerb or swinging wide into oncoming traffic; Grade 2 for steering or observation faults.
Hill Start / Gradient Moving Off
Technique: Bring vehicle to standstill on gradient with footbrake, secure handbrake, select 1st gear. Set engine revolutions slightly above idle (1200-1500 RPM). Bring clutch up smoothly until vehicle bonnet rises slightly (biting point). Complete mirror and right-shoulder blind spot check. Release handbrake smoothly; car moves forward without rolling backward.
Common Pitfalls: Releasing handbrake before clutch reaches bite, resulting in backward rollback; over-revving engine or dropping clutch rapidly causing engine stall.
Marking Severity: Rolling back more than 15cm is an immediate Grade 2; rolling back into following traffic is an immediate Grade 3 failure.
Perpendicular / Bay Parking
Technique: Approach designated test centre bay in 1st gear. Apply MSM routine, swing out slightly to create 90-degree turning angle, steer smoothly into centre of bay. Straighten wheels, stop smoothly before barrier or kerb, engage neutral and secure handbrake.
Common Pitfalls: Parking over the marked white bay lines; straddling two bays; failing to check mirrors before swinging wide.
Marking Severity: Grade 2 for poor positioning outside lines; Grade 3 if hazarding parked cars or pedestrians.
Parallel Parking (Kerbside Reversal)
Technique: Drive alongside target vehicle with 1 metre lateral clearance, aligning rear bumpers. Select reverse gear and perform full 360° observation sweep (including right blind spot). Reverse straight until rear axle aligns with target car's bumper, then apply 1 brisk turn of steering towards the kerb (45° angle). As front passenger wheel clears the target car's bumper, steer briskly away from the kerb to bring vehicle parallel within 30-45 cm. Secure with handbrake and select neutral.
Common Pitfalls: Approaching too close (<0.8m) to parked vehicle; failing to check right blind spot before swinging front out; touching or mounting the kerb; finishing further than 50cm from the kerb.
Marking Severity: Mounting or bumping the kerb is an automatic Grade 3 test failure; parking >50cm from kerb or taking more than 2 shunt corrections is a Grade 2 fault.
Emergency Stop (Simulated Hazard Halt)
Technique: Upon examiner's signal, immediately release accelerator and apply footbrake firmly and progressively without snatching the steering wheel. Depress clutch pedal just before vehicle comes to a complete halt to prevent engine stall. Secure handbrake, select neutral, take a calming breath, and check all mirrors before moving away.
Common Pitfalls: Depressing clutch before footbrake (coasting); skidding tyres due to violent snatching; failing to check 360° before moving off again.
Marking Severity: Grade 2 for delayed reaction or uncontrolled braking.